
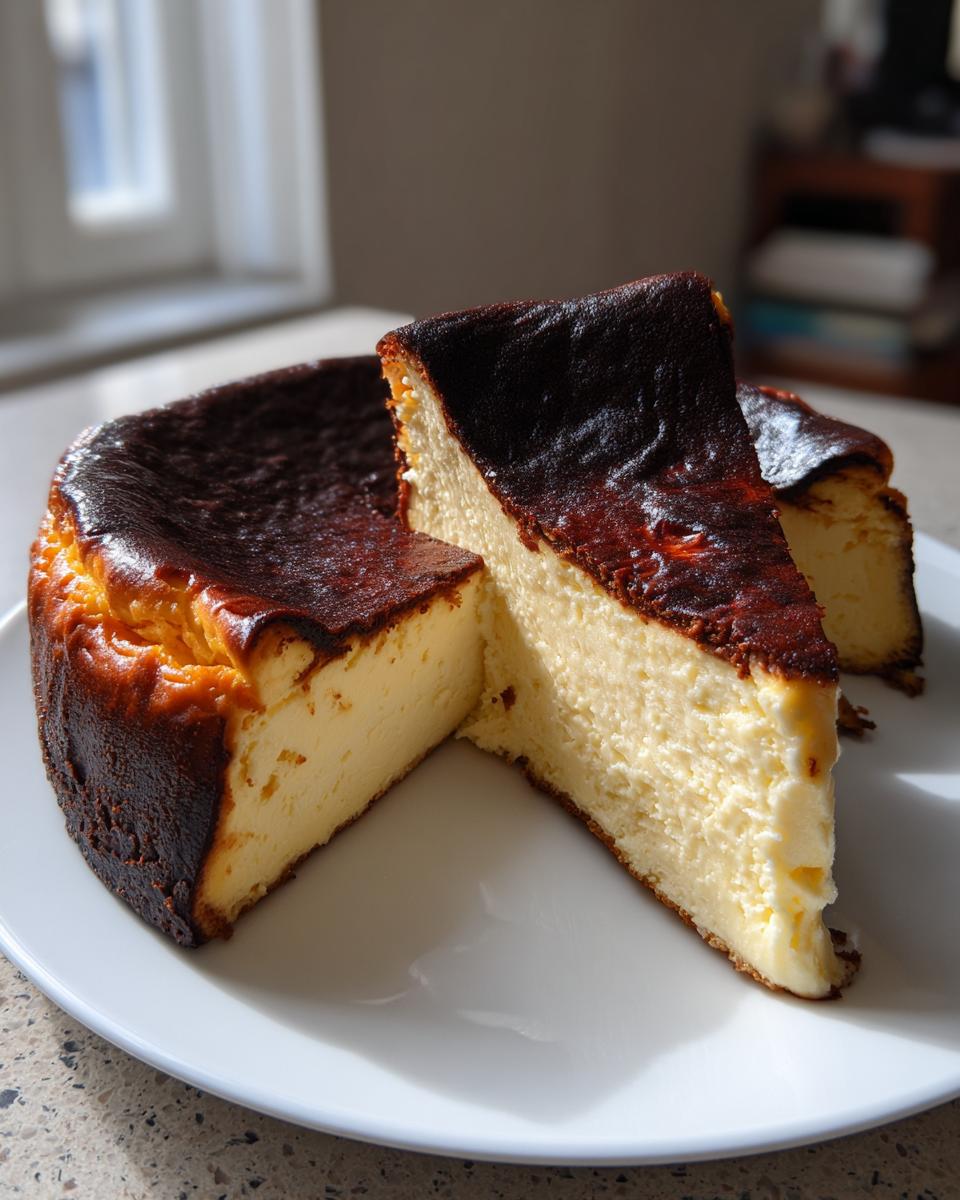
Oh my goodness, if you’ve been scrolling online lately, you’ve seen it—that stunning, dramatically dark-topped cake that looks like it came straight from a fancy bakery but somehow smells like pure comfort. That, my friends, is the legendary Basque Cheesecake, and trust me, it’s not just hype! It’s the ultimate showstopper that requires surprisingly little fuss. Here at Chefsily, Isabella is all about taking those gourmet, impressive dessert ideas and shrinking the technique down so anyone can tackle them. This version ditches the intimidating water bath and the fussy crust, focusing instead on that signature caramelized top and the divinely creamy interior. If you’re looking for more show-stopping treats like this, be sure to check out all of my delicious dessert recipes!
- Why This Is The Best Basque Cheesecake Recipe You Will Make
- Simple Ingredients for Your Basque Cheesecake
- Equipment Needed for Your Basque Cheesecake
- How to Make Basque Cheesecake: Step-by-Step Instructions
- Tips for Success with Your Rustic Baked Cheesecake
- Serving Suggestions for Your Decadent Cheesecake Dessert
- Storage and Reheating Instructions for Leftover Basque Cheesecake
- Frequently Asked Questions About Basque Cheesecake
- Share Your Impressive Dessert Ideas
Why This Is The Best Basque Cheesecake Recipe You Will Make
I know there are a million cheesecake recipes out there, but this Basque cheesecake is the one you actually need. Seriously. It hits every single high note without the usual drama that comes with baked cheesecakes. We skip the crust entirely, which saves you time and makes it the ultimate easy crustless cheesecake!
I promise you’ll get that incredible, show-stopping look that everyone talks about. For me, the biggest win here is how reliably decadent this turns out. You get a creamy cheesecake texture every single time, even if you think baking is scary.
- No crust means less fuss and no sticking worries!
- We skip the scary water bath—just set it and forget it, almost.
- Every single ingredient is something you probably have in your fridge right now.
If you love rich, decadent desserts, you should also check out my recipe for rich and creamy chocolate cheesecake while you’re planning your baking days!
Achieving the Perfectly Caramelized Top Dessert
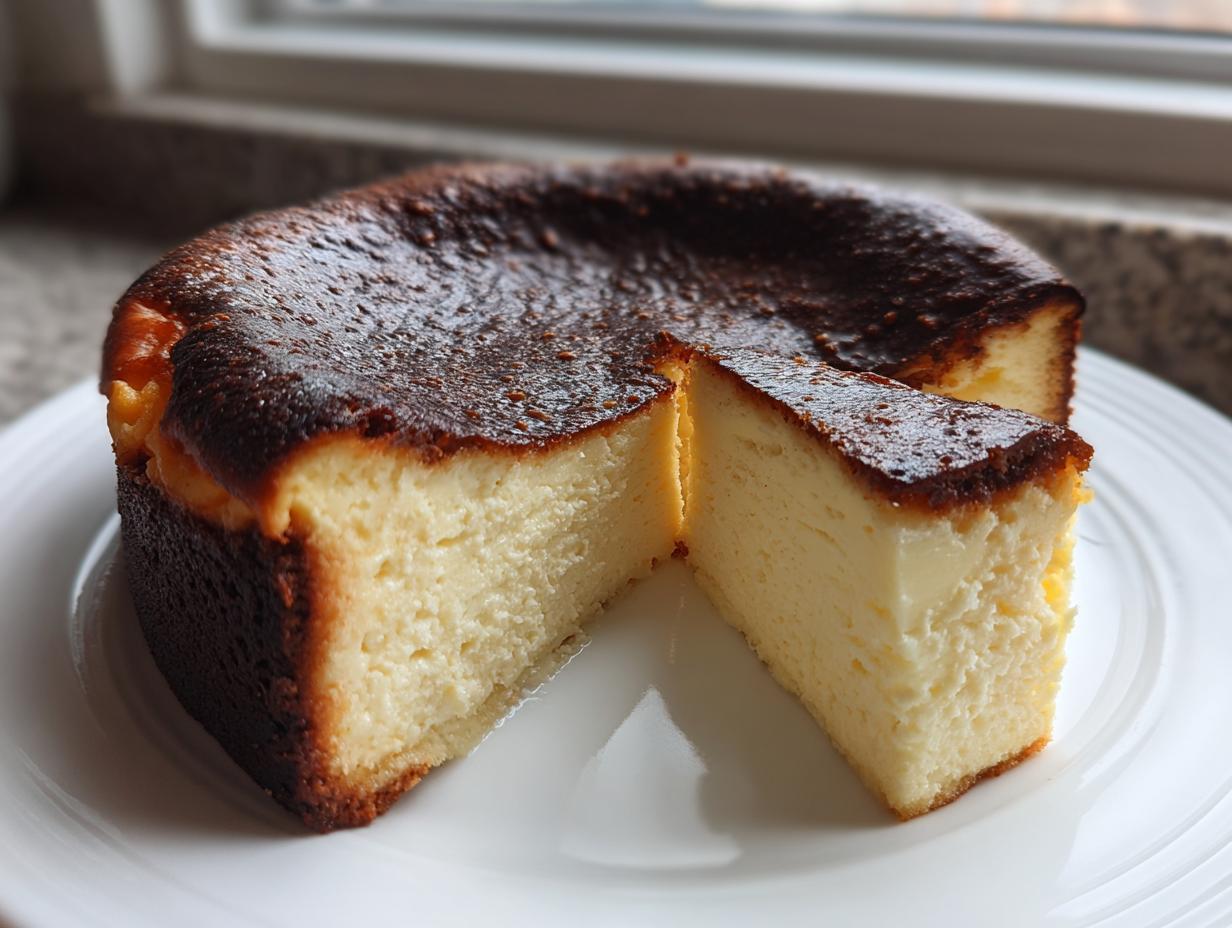
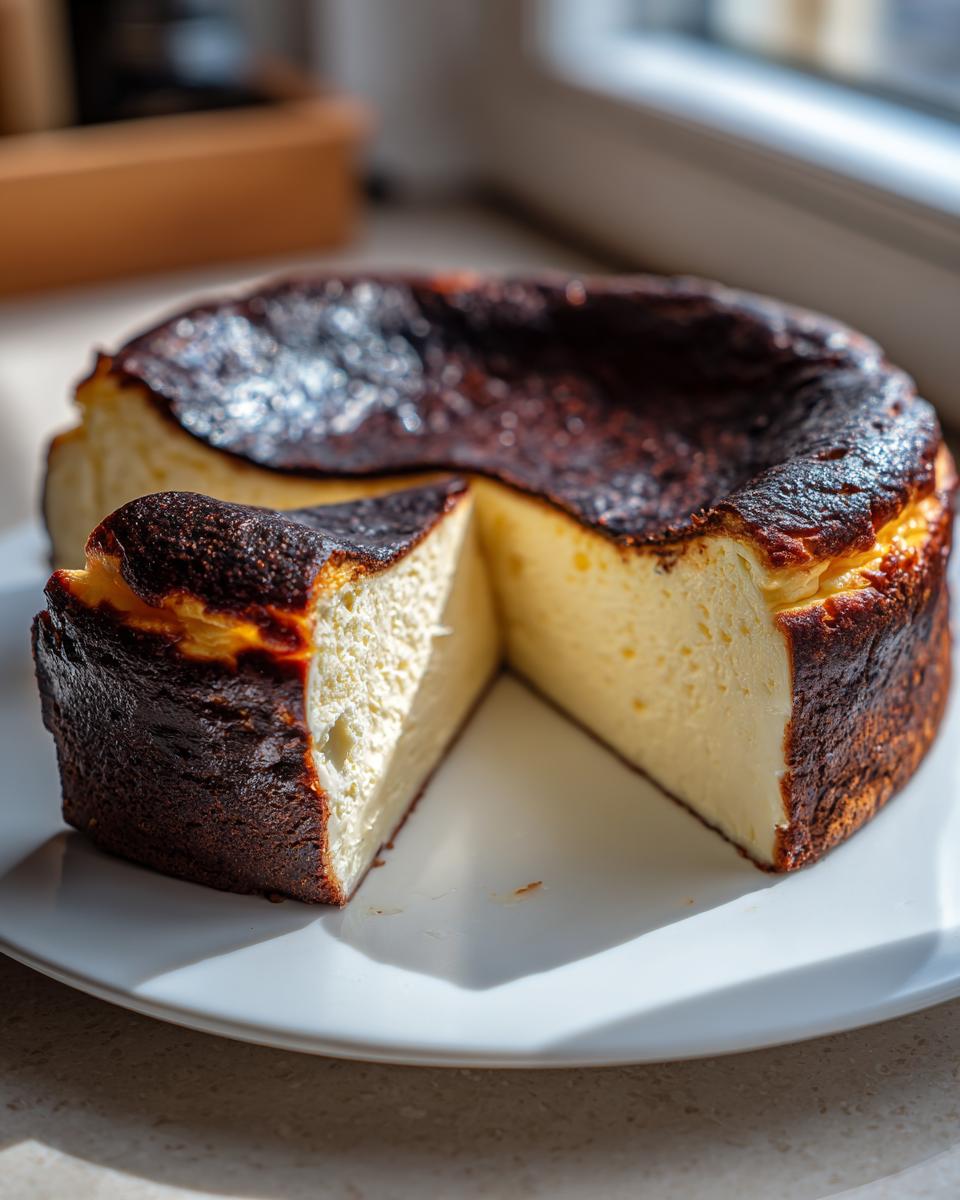
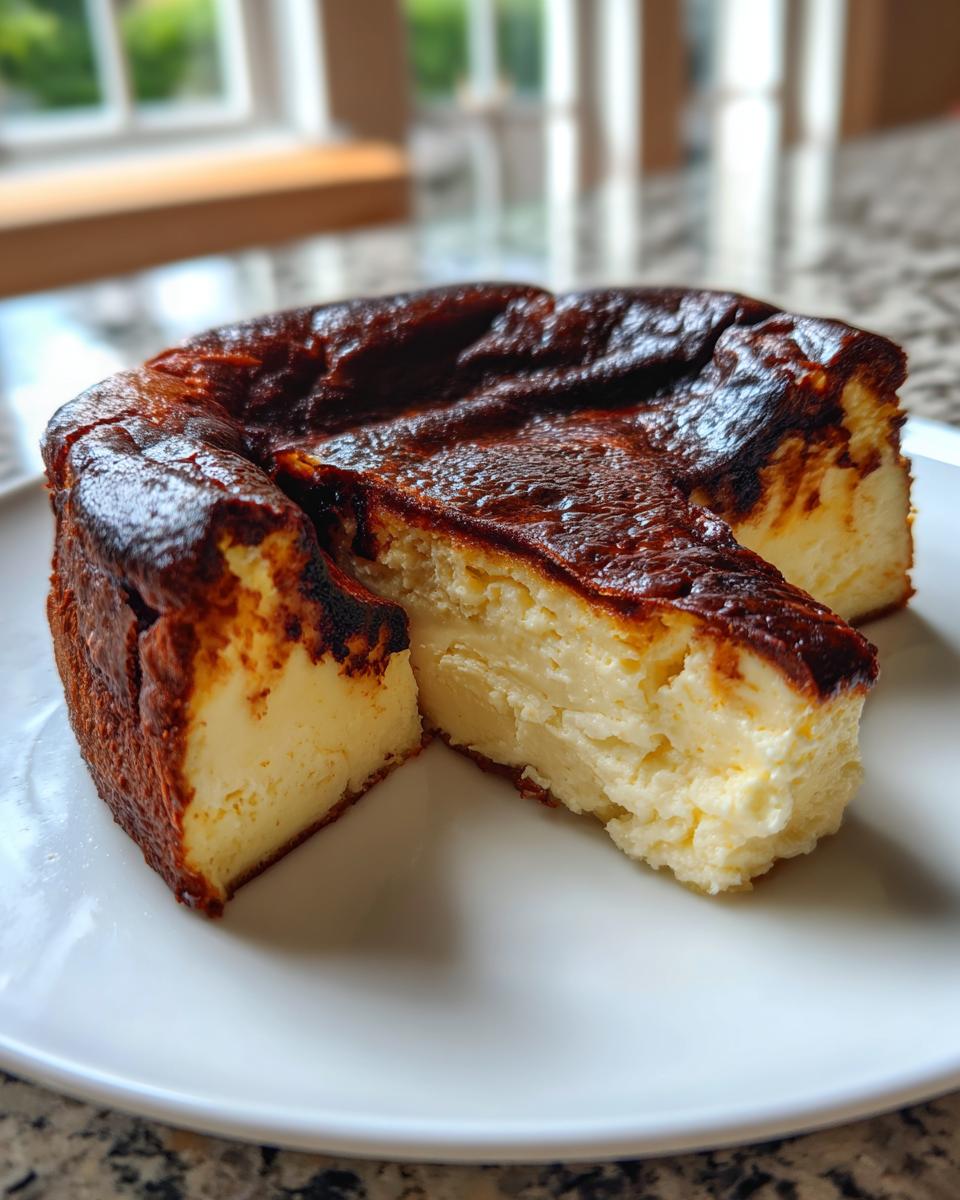
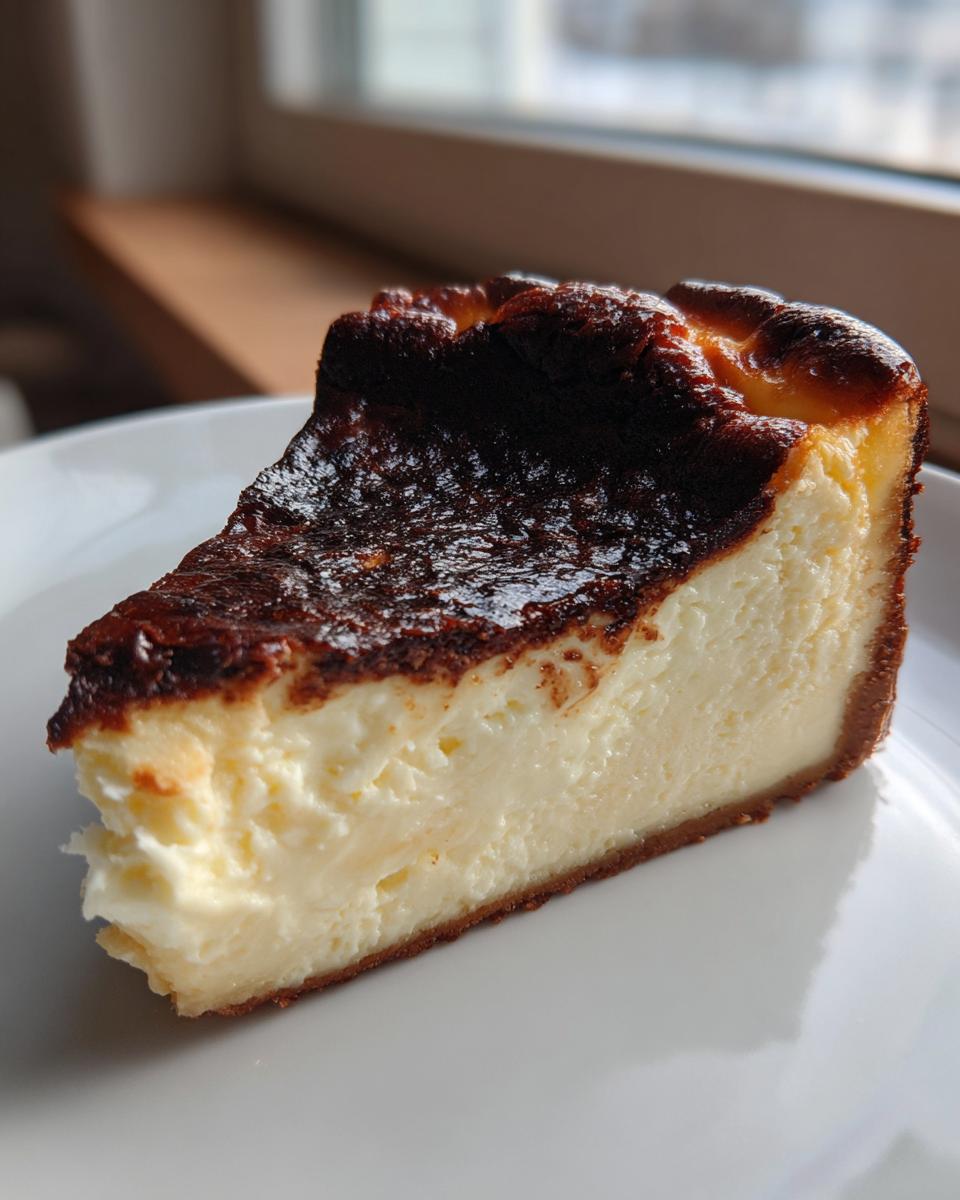
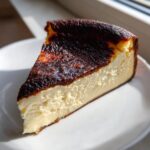
That dramatic, almost black top is what makes this a Caramelized top dessert icon. Don’t be scared by the color! We crank the heat way up because the sugars need that intense blast to caramelize fast before the center overcooks. That dark spot is pure flavor—it’s rustic perfection, not a mistake!
The Secret to a Custardy Center Cheesecake
The texture is everything, right? For that signature smooth, custardy center cheesecake that melts in your mouth, you have to trust the process, not the timer alone. Make sure your cream cheese and eggs are fully at room temperature; this helps prevent lumps. When you take it out, the middle should still wobble like soft jelly—that jiggle is the indicator that guarantees creaminess once it chills down.
Simple Ingredients for Your Basque Cheesecake
Another thing I love about the Basque cheesecake is how humble the ingredients list looks. Seriously, this is one of those desserts where you don’t need a specialty grocery run. We’re talking about staple items here, making it the definition of a Simple ingredient cheesecake that delivers gourmet results.
The only non-negotiable rule is that your 900g of full-fat cream cheese and your 6 large eggs absolutely *must* be at room temperature before you even start mixing. That’s how we keep everything smooth!
- 900g full-fat cream cheese, fully softened to room temperature
- 1 1/4 cups granulated sugar
- 6 large eggs, also at room temperature
- 2 cups heavy cream (don’t skimp on the fat content!)
- 1 teaspoon vanilla extract
- 1/4 teaspoon salt
- 1/4 cup all-purpose flour
That’s it! No lemon zest, no fancy flavorings needed—the magic is truly in the caramelization and the rich dairy.
Equipment Needed for Your Basque Cheesecake
Okay, prepping your tools is half the battle for a successful Basque cheesecake. Since this dessert is famous for its rustic, cracked look, we need the right vessel to help create that towering height and dramatic burn. You absolutely need a 9-inch springform pan. That removable side is the only way to get this beauty out without destroying it!
The other star here is the parchment paper. You’re going to use a ton of it—at least two large sheets, crinkled slightly and pressed right up the sides of the pan. This is what gives your rustic baked cheesecake its iconic, high-sided, crinkled edge. Don’t worry if it looks messy; that’s precisely what we want!
Now, if you’re making a smaller batch or only feeding a few people, I highly recommend grabbing a standard loaf pan instead. If you check out my notes later, I’ll show you how to adapt the recipe for a smaller cheesecake using that pan—it’s fantastic for an individual Basque cheesecake when you don’t want to commit to the big recipe!
How to Make Basque Cheesecake: Step-by-Step Instructions
Okay, deep breath! This is the part where we transform simple ingredients into that famous gourmet homemade dessert. Honestly, the steps for this Basque cheesecake are straightforward, but the order matters so much for that super creamy result. Pay close attention to the mixing—that’s where the magic happens, or where things can go sideways if you’re not careful! I want you to think of this as an incredibly simple yet elegant baking project. If you love rich, dense desserts, you might also want to peek at my chocolate chip cheesecake recipe for another showstopper!
Preparing the Pan for the Basque Cheesecake
First things first, get your oven preheated to a roaring 400°F (200°C). Now for the parchment paper! This is the non-negotiable step for the rustic baked cheesecake look. You need two large sheets, crisscrossing them in your 9-inch springform pan. Don’t be neat about it; really press them down into those corners, and let them stick up way over the edges—we want that high, crinkled collar. It traps the heat beautifully and gives the cake that famous, slightly slumped, craggy appearance as it cools down.
Mixing the Creamy Cheesecake Batter
We start by beating the room-temperature cream cheese until it’s silky smooth on its own—scrape down those sides! Then, gradually dump in the sugar and beat it until it looks light and fluffy—you’re creaming it just like a regular cake batter. Next, the eggs go in, one by one. I mean it: one egg, mix until *barely* combined, scrape down, *then* the next one. This keeps air incorporation gentle. After the eggs, mix in the heavy cream, vanilla, and salt until it just comes back together. Finally, dust that flour over the top and gently fold it in with a spatula. Stop as soon as you don’t see white streaks anymore. Overmixing at this stage guarantees a tough cake, not the creamy texture we love!
Baking and Cooling the Caramelized Top Dessert
Gently pour the batter into your prepared, towering pan. Into the high heat it goes for about 50 to 60 minutes. You are looking for a deeply browned top—it should look almost black in spots! When you gently nudge the counter, the center of your Basque cheesecake should still have a noticeable, soft wobble. That jiggle is proof that the inside is still wonderfully liquid and custardy. Once it’s baked, let it cool completely on the counter for a good couple of hours. Then, cover it up and move it to the fridge for at least six hours, but honestly, overnight is always best for achieving that dense, glorious texture. If you look at recipes online, like the one found here, they all stress that patience during the cooling phase is key to avoiding cracks later!
Tips for Success with Your Rustic Baked Cheesecake
Now that you know the steps for this incredible Basque cheesecake, I want to give you a few insider tips from my own baking failures so you can skip mine! If your batter looks a little curdled when you add the eggs, don’t panic! It usually means your cream cheese wasn’t soft enough. Just keep mixing gently until it smooths out again. Remember, this isn’t a New York style cheesecake where we fear cracks; we *want* the rustic look. If you’re really nervous about the texture, remember that overnight chilling is truly your best friend. Chilling overnight ensures that dreamy, silky interior so you get that perfect creamy cheesecake mouthfeel when you finally slice into it. If you prefer an absolutely crack-free, super-smooth top, you might want to compare notes with other techniques, like those used for a classic New York style cake, but know that the burnt look is the highlight here!
Also, when it comes to serving, I saw a huge debate online about slicing it straight from the fridge versus letting it warm up. For the truest San Sebastian experience, pull it out about 30 minutes before serving. It softens up just enough to emphasize that custardy center. You can see great tips on achieving that perfect texture on sites like this one, which also emphasizes letting it breathe a bit before slicing!
Serving Suggestions for Your Decadent Cheesecake Dessert
This is where things get fun, but also where people sometimes trip up! We worked so hard to get that perfect Basque cheesecake texture, so how you serve it matters. Honestly, I recommend letting it sit out for 30 minutes before you bring it to the table. Right out of the fridge, it’s perfectly fine—it’ll be denser, almost like a traditional cheesecake sometimes. But if you want that incredible, almost soufflé-like, melt-in-your-mouth experience, letting it warm up just a touch is the secret weapon!
Since the flavor is so pure and rich, you don’t need much else going on, but a simple garnish goes a long way for presentation. I love dusting a little extra powdered sugar over the top right before serving to contrast nicely with that dark, caramelized crust. Or, for a little extra flair—especially if you’re feeling fancy like you’re making a white chocolate mousse tart—a small smear of tart berry coulis on the plate is divine. It cuts through the richness beautifully without fighting the flavor of this decadent cheesecake dessert!
Storage and Reheating Instructions for Leftover Basque Cheesecake
Oh, the joy of having leftovers from a spectacular Basque cheesecake! First off, good luck making it last, because this stuff disappears fast. When you do manage to save some, storage is super easy, but remember, we are still dealing with a high-dairy item.
You need to keep it covered tightly in the refrigerator. I usually use plastic wrap directly over the surface of the cheesecake, but make sure it’s not touching the caramelized top if you can avoid it, just in case it absorbs any fridge smells. Honestly, it holds up wonderfully for about four or five days in the fridge. That chilling time actually helps the texture set even firmer if you prefer that denser bite!
Now, let’s talk reheating—and here’s the crucial part for this specific cake. You simply do not reheat cheesecake! Putting this rich dessert back in the oven or microwave will ruin that beautiful, creamy texture we worked so hard to achieve. If you try to reheat it, you’ll likely end up with a gooey, slightly separated mess. The best way to enjoy leftovers is simply to pull the slice out of the fridge about 30 minutes before you plan to eat it. That little bit of time at room temperature is all you need to bring that custardy center back to life. It’s the best way to enjoy your saved slice of Basque cheesecake!
Frequently Asked Questions About Basque Cheesecake
I know when you tackle something as gorgeous as the Basque cheesecake, you’re going to have questions! It’s totally normal, especially when recipes look deceptively simple but deliver such a gourmet result. I’ve gathered up the ones I hear most often so you can bake with total confidence. If you’re looking for other comforting recipes after you’ve devoured this, you might enjoy my guide to homemade brown gravy!
Can I make the Basque Cheesecake ahead of time?
Yes, please do! In fact, making this ahead is highly encouraged. While the baking process is fast, the chilling time is absolutely critical for achieving the right texture. I always tell people the very best results happen when you let your cheesecake chill in the fridge overnight—at least six hours minimum. This overnight rest lets that custardy center firm up just enough so you get that perfect, luxurious mouthfeel when you finally slice into your creamy cheesecake.
What if my Basque Cheesecake top isn’t burnt enough?
First, take a breath! Remember, this is supposed to be a rustic baked cheesecake. If the top looks deeply golden brown but not black enough for your liking, you have two options. Option one, and my preference: just serve it! The flavor will be fantastic, and the look is still beautiful. Option two, and use extreme caution here: if it’s only been in the oven 45 minutes and looks pale, you can switch your oven to the broiler setting for 60 to 90 seconds. Watch it like a hawk! It burns faster than you can blink, so don’t walk away!
Is this truly an easy crustless cheesecake to master?
Absolutely, yes! That’s the whole point of this viral trend. Compared to a traditional New York style cake, this is practically foolproof. You don’t need to worry about cracks because we bake it so hot and fast, and we skip the fussy water bath entirely. If you can comfortably soften cream cheese and use an electric mixer, you can master this easy crustless cheesecake. It’s the easiest way to bring an impressive, gourmet dessert to the table!
Share Your Impressive Dessert Ideas
Now that you have the secrets to making this stunning, Gourmet homemade dessert, I need to see what you’ve created! Please try this Basque cheesecake recipe and tell me all about your results in the comments below. Did you embrace the dark caramelization? How did you serve yours? If you snap a picture of your beautiful rustic creation, tag us! We absolutely love seeing your bakes. If you’re planning your next easy weeknight meal, don’t forget to check out my easy chicken tacos for something totally different!
PrintThe Ultimate Easy & Creamy Burnt Basque Cheesecake (No Crust, No Water Bath)
Make the viral Burnt Basque Cheesecake, known for its perfectly caramelized top and rich, creamy interior. This recipe requires simple ingredients, no crust, and no water bath, making it an easy yet impressive gourmet dessert for any gathering.
- Prep Time: 15 min
- Cook Time: 60 min
- Total Time: 7 hours 15 min
- Yield: 10 servings 1x
- Category: Dessert
- Method: Baking
- Cuisine: Spanish
- Diet: Vegetarian
Ingredients
- 900g full-fat cream cheese, softened
- 1 1/4 cups granulated sugar
- 6 large eggs, room temperature
- 2 cups heavy cream
- 1 teaspoon vanilla extract
- 1/4 teaspoon salt
- 1/4 cup all-purpose flour
Instructions
- Preheat your oven to 400°F (200°C). Line a 9-inch springform pan with two large sheets of parchment paper, pressing them into the pan so they stick up high above the rim. This creates the rustic look.
- In a large bowl, beat the softened cream cheese with an electric mixer until completely smooth, about 2 minutes. Scrape down the sides.
- Gradually add the sugar and beat until the mixture is light and fluffy.
- Add the eggs one at a time, mixing well after each addition until just combined. Do not overmix.
- Slowly mix in the heavy cream, vanilla extract, and salt until smooth.
- Sift the flour over the batter and gently fold it in using a spatula until no streaks of flour remain.
- Pour the batter into the prepared pan. The batter will fill the pan high.
- Bake for 50 to 60 minutes. The top should be deeply caramelized, almost black in spots, and the center should still wobble significantly when gently shaken.
- Remove the cheesecake from the oven. It will deflate as it cools. Let it cool completely on a wire rack at room temperature for about 2 hours.
- Once cool, cover the pan loosely and chill in the refrigerator for at least 6 hours, or preferably overnight, for the best creamy texture.
- Before serving, carefully remove the sides of the springform pan and peel away the parchment paper. Serve chilled or allow it to come to room temperature for a softer, more custardy center.
Notes
- For a smaller batch or easier serving, use a standard loaf pan lined with parchment paper instead of a 9-inch springform pan. Adjust baking time slightly, checking for the wobble after 40 minutes.
- Serving the cheesecake at room temperature enhances the creamy, soufflé-like texture that defines this dessert.
- Do not try to achieve a perfectly smooth top before baking; the cracks and dark spots are the signature look of this rustic cheesecake.
Nutrition
- Serving Size: 1 slice
- Calories: 450
- Sugar: 35g
- Sodium: 250mg
- Fat: 32g
- Saturated Fat: 20g
- Unsaturated Fat: 12g
- Trans Fat: 0.5g
- Carbohydrates: 38g
- Fiber: 0g
- Protein: 8g
- Cholesterol: 180mg