
Oh, hello there! Let’s talk about dessert, because honestly, what’s better than something that tastes incredibly decadent but takes almost zero effort? I live for those sweet, surprising combinations, and that’s exactly what you get with the amazing sopapilla cheesecake. This isn’t your average heavy cake, my friends; it’s this dreamy hybrid where flaky, buttery pastry meets impossibly creamy cheesecake filling. It’s pure comfort! Here at Chefsily, I’m Isabella Rossi, and my whole mission is taking those show-stopping holiday treats and breaking them down so you can make them on a Tuesday night. You can browse more of my favorite delicious dessert recipes later, but right now, trust me, you are going to want this recipe in your rotation. It’s just too easy and too good not to share!
- Why This Easy Sopapilla Cheesecake Bars Recipe Works (E-E-A-T Focus)
- Gathering Ingredients for Your Sopapilla Cheesecake
- Step-by-Step Instructions for the Best Sopapilla Cheesecake
- Tips for Perfect Sopapilla Cheesecake Every Time
- Serving Suggestions for This Mexican Inspired Cheesecake
- Storing and Reheating Your Sopapilla Cheesecake
- Frequently Asked Questions About Sopapilla Cheesecake Recipe
- Nutritional Estimates for This Gooey Cinnamon Dessert
- Share Your Easy Sopapilla Cheesecake Experience
Why This Easy Sopapilla Cheesecake Bars Recipe Works (E-E-A-T Focus)
When I first adapted this dessert, I needed something that felt impressive but didn’t require me to start from scratch. That’s why this easy sopapilla cheesecake bars recipe is my go-to for potlucks and weeknight cravings! We rely on incredibly accessible ingredients, mostly that brilliant, pre-made crescent roll dough, which keeps the prep time down to practically nothing.
The reliability factor is huge here. If you follow these steps, you get consistency every single time. It’s why this falls into the ‘crowd-pleasing’ category—it just always disappears first at any gathering.
Texture and Flavor Profile of Sopapilla Cheesecake
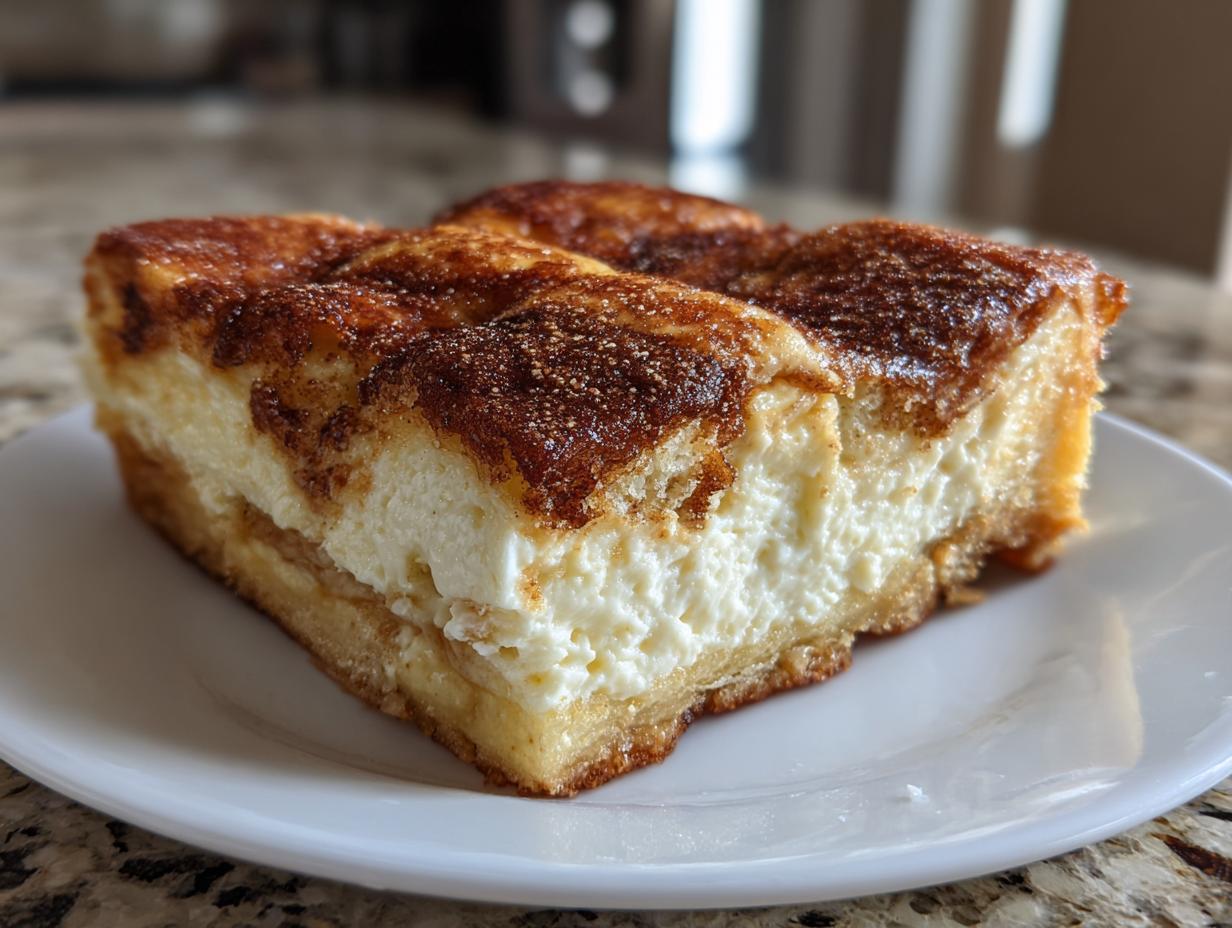
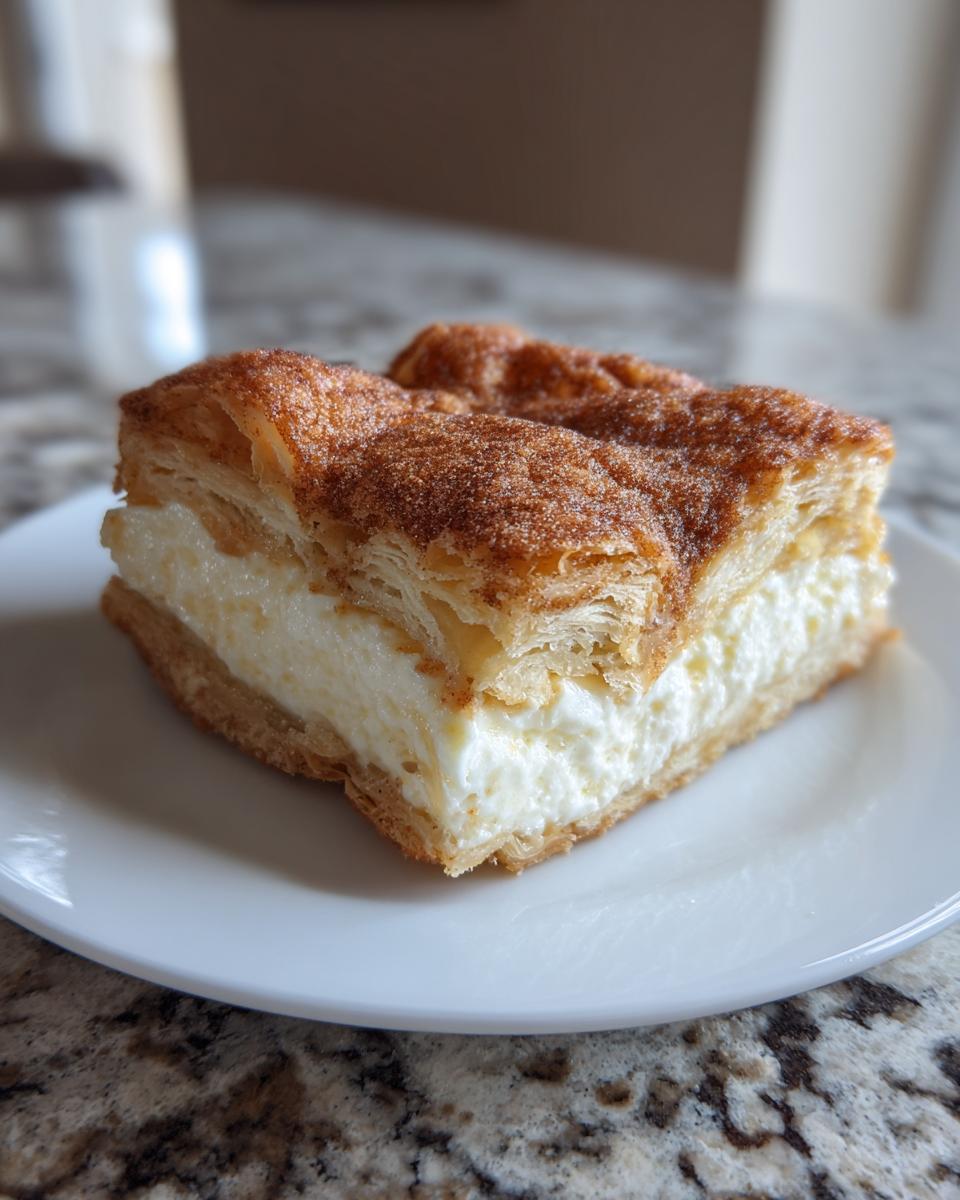
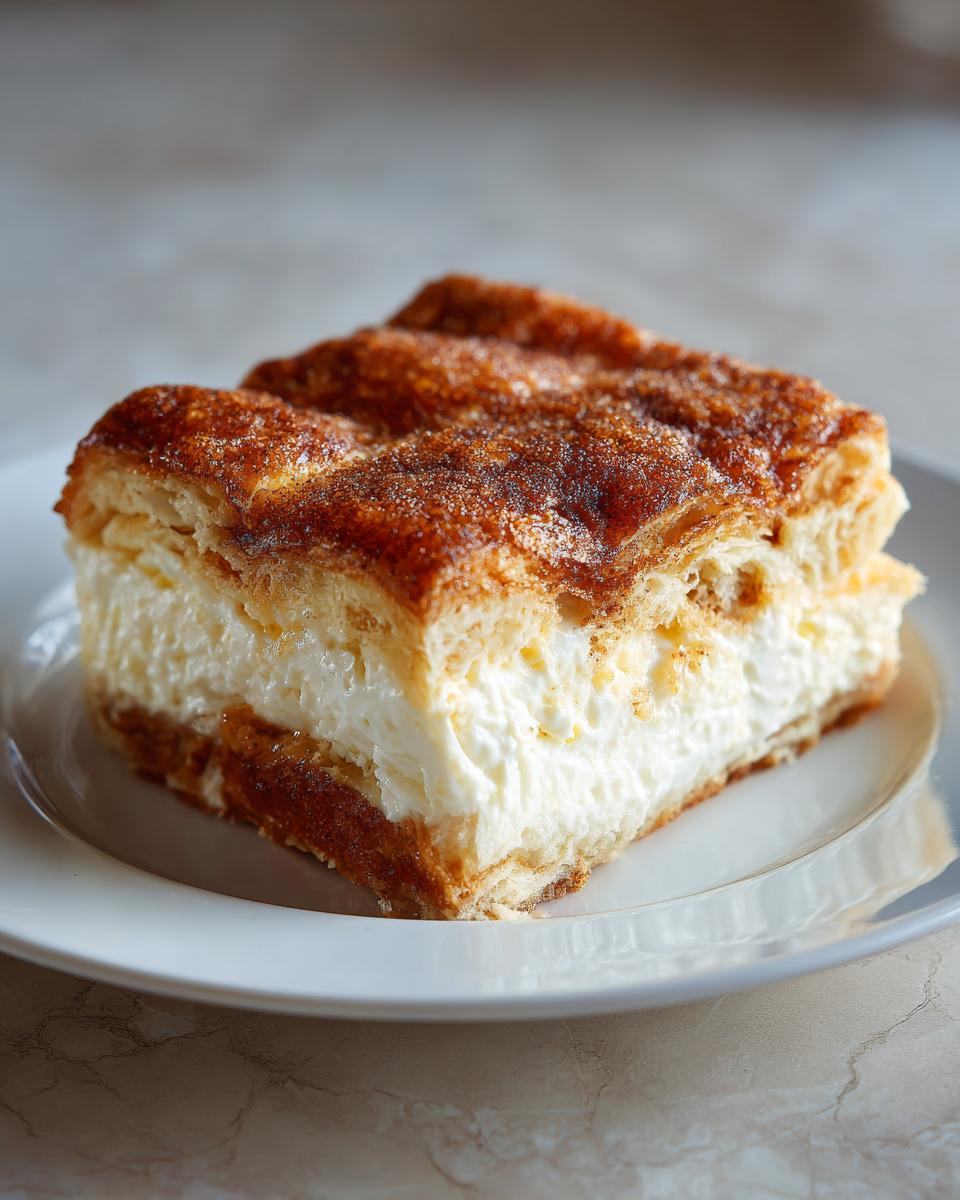
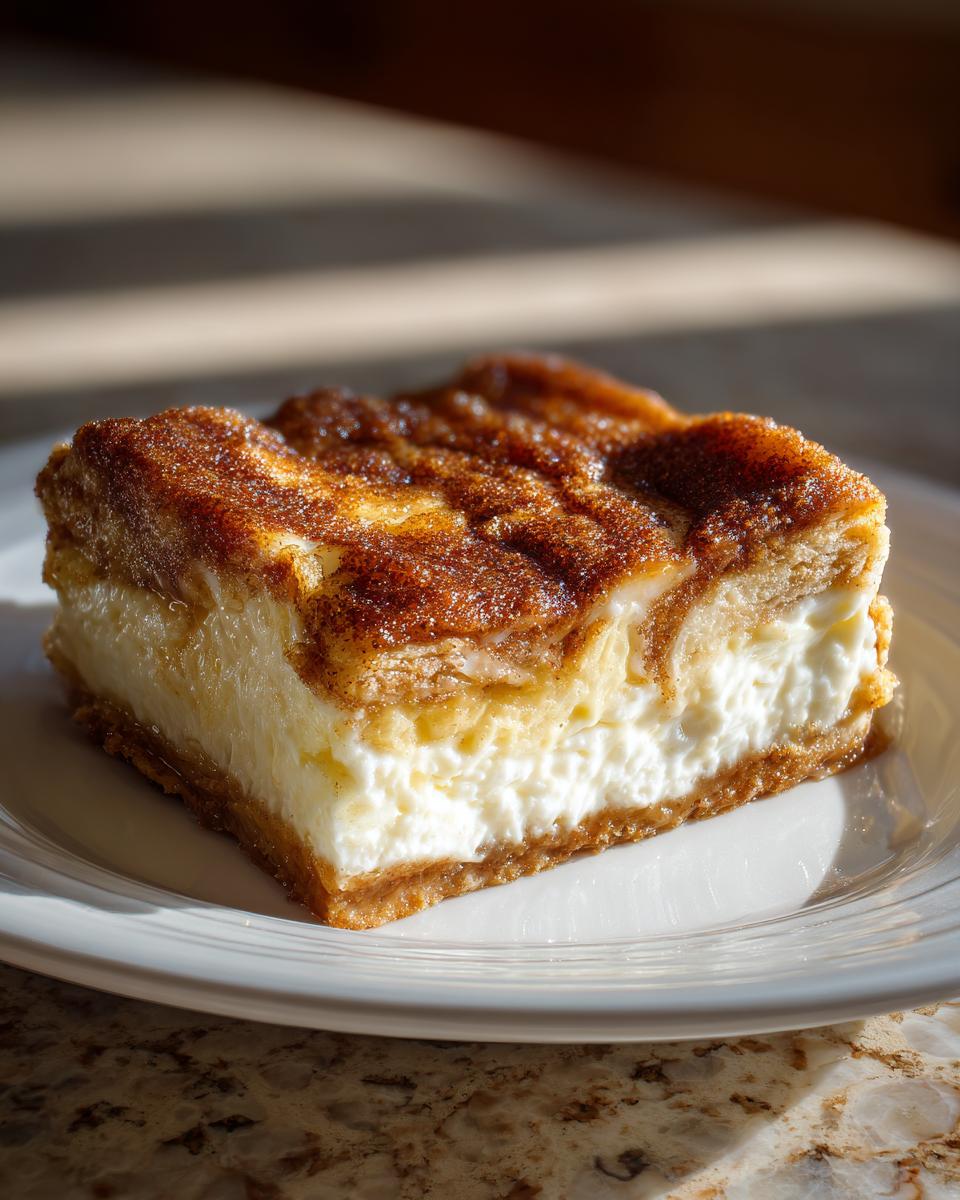
Tell me, what’s not to love about a dessert that delivers three perfect textures at once? You get that wonderfully flaky, slightly crisp layer from the top and bottom crescent dough. Then, smack in the middle, you hit that cool, dreamy, creamy cheesecake dessert filling. It’s truly heaven!
But the real star, the thing that ties it all together, is that buttery, crunchy cinnamon-sugar topping. Honestly, eating one of these bars is just like biting into a delicate, baked churro that happens to have a gooey center. It’s spectacular, and you don’t have to mess with frying anything, which I know is a big win for everyone!
If you are looking for other incredibly simple, trusted recipes, you should definitely check out my recipe for easy creamy white chicken chili—sometimes the savory side needs that same quick, reliable magic!
Gathering Ingredients for Your Sopapilla Cheesecake
Honestly, the best part about this sopapilla cheesecake recipe is that there are no strange trips to specialty stores involved! I wanted this to be your go-to recipe, meaning everything here comes straight from the regular aisle at your favorite grocery store. We use the dough that comes in a can! Can you believe how easy that makes things? Let’s lay out exactly what you need so you can be ready to assemble this magic in about fifteen minutes.
Ingredient Clarity for the Flaky Cheesecake Bars
When you’re grabbing things from the store, make sure you have these exact measurements. Precision with the filling keeps everything perfectly smooth, and having the right amount of dough ensures we get those incredible flaky layers.
- 2 (8 ounce) tubes refrigerated crescent roll dough (That’s right, two cans!)
- 1 (8 ounce) package cream cheese, softened completely
- 1 cup granulated sugar (This is for the filling, not the topping!)
- 1 large egg
- 1 teaspoon vanilla extract
- 1/2 cup (1 stick) unsalted butter, melted—this is for the top!
- 3/4 cup granulated sugar (This joins the cinnamon for the topping)
- 2 teaspoons ground cinnamon
Step-by-Step Instructions for the Best Sopapilla Cheesecake
Okay, let’s get baking! This recipe moves *fast*, so have everything measured out before you turn on the oven. We’re making sure this sopapilla cheesecake is perfect, and speed is our friend here. You’ll notice how we separate the work into prepping the base, layering the filling, and then getting that glorious crust on top. It really is straightforward, but you have to stay attentive during the assembly phase!
Preparing the Base Layer and Cream Cheese Filling
First things first, get that oven preheated to 350 degrees F. That nice, steady heat is exactly what we need. Spray a standard 9×13 inch baking dish lightly—we want easy cleanup later! Now, take one whole tube of those crescent rolls and unroll them right into the bottom of your dish. Press that dough firmly and evenly across the bottom; no gaps allowed!
While that’s sitting, whip up the filling. In a bowl, you need to beat that softened cream cheese, one cup of sugar, your egg, and the vanilla until it is absolutely, totally smooth. I mean it—no lumps! Scrape every bit of that cream cheese dessert bars filling right over the dough layer. Make sure it’s a nice, even blanket across the base.
Assembling and Topping Your Sopapilla Cheesecake
Time for the second layer of pastry! Carefully unroll that second tube of dough and lay it gently over your filling. This is important: go around the edges and pinch those seams together well. We are creating a little dough pocket to hold all that delicious filling in! I always run my fingers right over the sides just to be sure they are sealed shut.
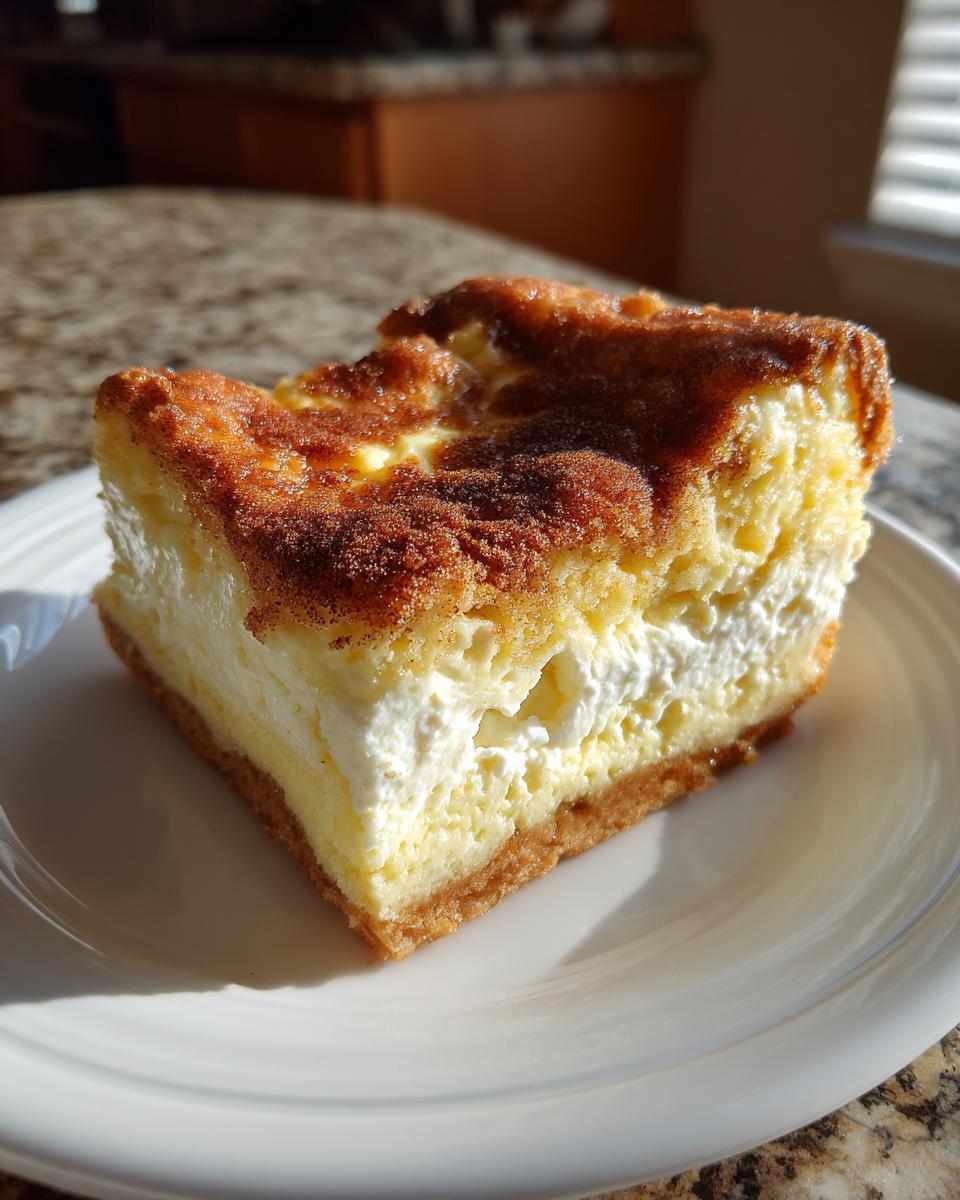
Now for the fun part! In a separate little bowl—don’t mix it in with the batter!—combine the remaining 3/4 cup of sugar and the two teaspoons of cinnamon. Get a pastry brush, melt that stick of butter, and brush it evenly across the top layer of dough. Then, sprinkle that cinnamon-sugar mixture over the buttered top. That’s what gives it that signature crunch!
Baking and Cooling the Cream Cheese Dessert Bars
Slide that whole pan into the oven for about 30 to 35 minutes. You are looking for a visual cue: the top should be beautifully golden brown, and when you give the middle a little jiggle, the filling should look set, not watery. If you want to see more about dough techniques (just in case you ever want to skip the cans!), check out my post on easy homemade naan bread skillet recipe for great dough handling tips.
This last step is the hardest, but you must listen to me! You simply have to let these magnificent bars cool completely in the pan before you even think about cutting them. If you cut them hot, that creamy filling will just run out everywhere, and we want those clean, perfect squares. Patience pays off!
Tips for Perfect Sopapilla Cheesecake Every Time
Now that you know the basic steps for this sopapilla cheesecake, let me give you the little insider tricks that really take it from good to ‘Oh my gosh, you have to make this!’ My goal is always to make sure you get that perfect flaky-to-creamy ratio, whether this is your first time or your tenth.
A lot of people get nervous about the texture, but these little tweaks make all the difference in earning the title of ‘best sopapilla cheesecake recipe’ in your house.
Ingredient Adjustments for Your Sopapilla Cheesecake
We always bake this in a 9×13 pan, but sometimes you want something richer, right? If you use a smaller 9×9 inch pan, you absolutely can make a thicker cheesecake layer. Just remember to pull back on the baking time slightly; you don’t want the center to stay runny.
For flavor, you know I love simple things, but sometimes you need a little zip! If you have it on hand, try grating just a tiny bit of fresh orange zest right into that cream cheese filling. It cuts through the sweetness beautifully. Also, don’t forget the classic finish: while it cools, a little drizzle of honey makes these bars taste even more special. If you love easy, sweet treats, you absolutely need to try my soft and chewy peanut butter blossom recipe next!
Serving Suggestions for This Mexican Inspired Cheesecake
Once these bars have cooled down—and please, I beg you, let them cool!—the presentation is half the fun. This Mexican inspired cheesecake melts in your mouth, but it looks just as good on a plate as it tastes! Since we aren’t adding a huge, thick glaze, these tend to look cleaner and show off those beautiful flaky layers.
My absolute favorite way to serve them, as I mentioned in the tips section, is while they are still slightly warm (but sturdy enough to hold their shape, obviously!) with a zigzag drizzle of honey over the top. If you’ve got good raw local honey, the slight floral notes play so nicely against that deep cinnamon flavor. It just elevates the whole experience. You could also serve these alongside a wonderful cool drink.
If you’re making these for a big party or need a lighter finish, a simple dusting of powdered sugar is elegant. Just use a fine-mesh sieve right before you set them out. It gives you that snowy look without adding extra sweetness, because honestly, these bars are already perfectly sweet!
If you’re looking for a delicious beverage to pair with this sweet, rich treat, you might want to try out my recipe for a refreshing strawberry matcha latte. The green tea balances the sugar surprisingly well!
Storing and Reheating Your Sopapilla Cheesecake
Since this cream cheese dessert bars recipe has such a fantastic, creamy center, we have to treat it nicely in the fridge! I always insist that leftovers get covered tightly. If you don’t use plastic wrap directly touching the surface, the top cinnamon sugar can get a little damp or absorb fridge odors, which we definitely want to avoid. You can keep these beauties securely covered in the refrigerator for up to four days.
Now, I know tempting fate and leaving them out, but trust me, they need that chill to keep the filling firm. When you pull them out, they get even more delightfully fudgy, which is a bonus!
The reheating part sometimes trips people up when it comes to those flaky crusts. If you are just having one bar and want that fresh-from-the-oven warmth, you have two good options. First, if you serve it cold, it’s great, but if you want to revive that lovely buttery texture, pop a single bar in the microwave for about 10 to 15 seconds. It’s just long enough to soften the filling slightly without turning the whole thing into a runny mess.
My personal favorite way, though, since we want to keep the crust from getting too soft, is to use the toaster oven or a regular oven. Just spread the bars out on a baking sheet and warm them at about 300 degrees F for about 5 to 7 minutes. That gentle heat wakes up the cinnamon sugar and really restores that flaky quality beautifully. Just watch them closely so that topping doesn’t burn!
Frequently Asked Questions About Sopapilla Cheesecake Recipe
It’s totally normal to have questions when you’re trying out a new favorite! This dessert is so simple, but people often wonder about prep timing or comparisons to classic baking. I’ve gathered the most common things folks ask me about making the best sopapilla cheesecake. Hopefully, this clears everything up so you can get baking!
Can I make this Sopapilla Cheesecake ahead of time?
Oh yes, you absolutely can! I love making things ahead, especially when company is coming over. You can assemble the entire sopapilla cheesecake—both dough layers and the cream cheese filling spread out—and cover it tightly with plastic wrap. Keep it refrigerated overnight, but make sure it’s well-wrapped so the dough doesn’t dry out. When you are ready to bake, let it sit on the counter for just about 20 minutes to take the chill off before popping it in the oven. Don’t try to bake it stone cold from the fridge, or the baking time will be wildly unpredictable!
What is the difference between Sopapilla Cheesecake Bars and a full cheesecake?
That’s a great question, especially since we’re dealing with a hybrid here! A traditional cheesecake, even a quick one, usually relies on a single crust, maybe graham cracker or maybe shortbread, keeping everything dense. These bars are very different because they are built with layers of flaky pastry dough. That dough is what makes it a fantastic crescent roll cheesecake dessert variation!
We use two sheets of the chilled crescent dough—one for the bottom and one for the top. This creates those gorgeous, flaky layers that contrast so wonderfully with the smooth, tangy filling inside. It makes these bars much easier to handle and serve than a huge, heavy round cheesecake!
If you are looking for other baked bar recipes that use simple methods but deliver big flavor, you should take a peek at my recipe for easy pecan pie bars with a buttery crust. They share that same satisfyingly sturdy structure!
Nutritional Estimates for This Gooey Cinnamon Dessert
Listen, when you’re eating something this rich and delicious—this dreamy gooey cinnamon dessert—you probably aren’t thinking about macros, right? I certainly don’t! But because I aim to be a companion you can trust in the kitchen, I want to give you a baseline idea of what’s in one of these glorious bars. Remember, since we’re using store-bought dough and lots of butter and cream cheese, these are treats, not diet food!
These numbers are my best estimations based on the ingredients list provided, broken down per serving (which is 1 of 12 bars). These figures don’t account for any additions you might have made, like a honey drizzle, so keep that in mind if you’re tracking strictly!
Here is what we are generally looking at for one serving:
- Serving Size: 1 bar
- Calories: 310
- Fat: 18g (with 10g of that being saturated fat—that’s where the richness comes from!)
- Carbohydrates: 33g
- Protein: 4g
It’s high on the satisfaction scale, low on the effort scale, and that sounds like a perfect win to me! Don’t sweat the details too much; just enjoy your incredible sopapilla cheesecake!
Share Your Easy Sopapilla Cheesecake Experience
Now that you’ve seen how simple it is to make this incredible dessert, I absolutely want to know how it turned out for you! Baking is always better when shared, and your success story truly makes my day. Did you drizzle it with honey like I suggested? Did you try adding that little bit of orange zest into the cream cheese? I am dying to know!
Please take a moment and leave a rating for this easy sopapilla cheesecake bars recipe right below. A simple star rating helps other home cooks know this recipe is reliable and worth trusting. And if you made any tweaks or substitutions—maybe you used puff pastry instead of crescent rolls, or you tried adding a little pinch of nutmeg into the cinnamon topping—shout them out in the comments!
We all learn so much from each other’s kitchens, and seeing your beautiful results helps make Chefsily the best resource for accessible, incredible desserts. If you run into any snags or have questions as you bake, don’t hesitate to reach out. You can always connect with me directly through the contact page as well. Happy baking, and I can’t wait to hear rave reviews about your sopapilla cheesecake!
PrintEasy Sopapilla Cheesecake Bars with Classic Cinnamon-Sugar Topping

Make this easy Sopapilla Cheesecake recipe. It combines flaky crescent roll layers, a smooth cream cheese filling, and a buttery cinnamon sugar topping for a dessert that tastes like a blend of churros and cheesecake. This Mexican-inspired dessert is simple to prepare and perfect for parties or weeknight treats.
- Prep Time: 15 min
- Cook Time: 35 min
- Total Time: 50 min
- Yield: 12 servings 1x
- Category: Dessert
- Method: Baking
- Cuisine: Tex-Mex
- Diet: Vegetarian
Ingredients
- 2 (8 ounce) tubes refrigerated crescent roll dough
- 1 (8 ounce) package cream cheese, softened
- 1 cup granulated sugar
- 1 large egg
- 1 teaspoon vanilla extract
- 1/2 cup (1 stick) unsalted butter, melted
- 3/4 cup granulated sugar
- 2 teaspoons ground cinnamon
Instructions
- Preheat your oven to 350 degrees F. Lightly grease a 9×13 inch baking dish.
- Unroll one tube of crescent roll dough and press it into the bottom of the prepared baking dish.
- In a medium bowl, beat the softened cream cheese, 1 cup of sugar, egg, and vanilla extract until the mixture is smooth. Spread this cream cheese filling evenly over the bottom layer of dough.
- Unroll the second tube of crescent roll dough and carefully place it over the cream cheese layer. Pinch the seams together to seal the edges.
- In a small bowl, mix the remaining 3/4 cup of sugar and 2 teaspoons of cinnamon.
- Brush the melted butter evenly over the top layer of dough. Sprinkle the cinnamon-sugar mixture over the buttered top layer.
- Bake for 30 to 35 minutes, or until the top is golden brown and the filling is set.
- Let the bars cool completely in the pan before cutting them into squares.
Notes
- For a richer flavor, you can drizzle a little honey over the bars after they cool.
- If you prefer a thicker cheesecake layer, use a 9×9 inch pan instead, but reduce the baking time slightly.
- You can use a box grater to grate a small amount of fresh orange zest into the cream cheese filling for a subtle citrus note.
Nutrition
- Serving Size: 1 bar
- Calories: 310
- Sugar: 25g
- Sodium: 250mg
- Fat: 18g
- Saturated Fat: 10g
- Unsaturated Fat: 8g
- Trans Fat: 0g
- Carbohydrates: 33g
- Fiber: 1g
- Protein: 4g
- Cholesterol: 45mg