
When that craving hits late at night—you know, the one that demands something sweet, salty, and unbelievably crunchy—you need a game plan. Forget complicated baking; we’re going straight for pure, creamy indulgence! This incredible butterfinger pie is my absolute go-to. It’s completely no-bake, meaning you can whip up this decadent, creamy peanut butter dessert faster than you can decide on a movie. Here at Chefsily, I always preach about simple, nostalgic American treats, and this pie brings back all the fun of candy bars without ever turning on the oven. Trust me, this recipe is going straight into your ‘Must Make Now’ folder. If you’re looking for more fantastic ideas, check out all my delicious dessert recipes!
- Why You Will Make This Easy Butterfinger Pie Recipe Again
- Essential Ingredients for Your Creamy Peanut Butter Dessert
- Equipment Needed for a Perfect No Bake Candy Bar Pie
- Step-by-Step Instructions for Your Butterfinger Pie
- Tips for the Best No Bake Butterfinger Pie
- Making Your Butterfinger Pie Ahead of Time
- Serving Suggestions for Your Crunchy Candy Dessert
- Frequently Asked Questions About Making Butterfinger Pie
- Estimated Nutrition for This Indulgent Sweet Treat
- Estimated Nutrition for This Indulgent Sweet Treat
Why You Will Make This Easy Butterfinger Pie Recipe Again
I kid you not, this recipe is what I pull out when I need a massive crowd-pleaser that requires zero oven time. It’s purely designed for maximum reward with minimal effort, which is exactly what a busy home cook needs. You’ll be rushing to make this again and again, I promise!
- Absolutely No Baking Required: Seriously, it’s a No Oven Dessert miracle! Just freezer time, not oven time, which is a huge win in the summer.
- Quick Prep Time: We’re talking about 20 minutes of hands-on work before it heads to the fridge. It’s the ultimate Quick Dessert for Parties when you’re short on time.
- The Ultimate Texture Combination: You get that satisfying snap from the candy pieces mixed with a filling so smooth it feels like velvet. It’s the definition of a Crunchy Candy Dessert!
- Crowd-Pleaser Status: Peanut butter, chocolate, and candy? Everyone loves this! It’s the perfect Family Favorite Pie that disappears instantly.
- Perfect Make Ahead Dessert: Since it needs hours to set up, you can truly make this the day before your event and forget about dessert drama.
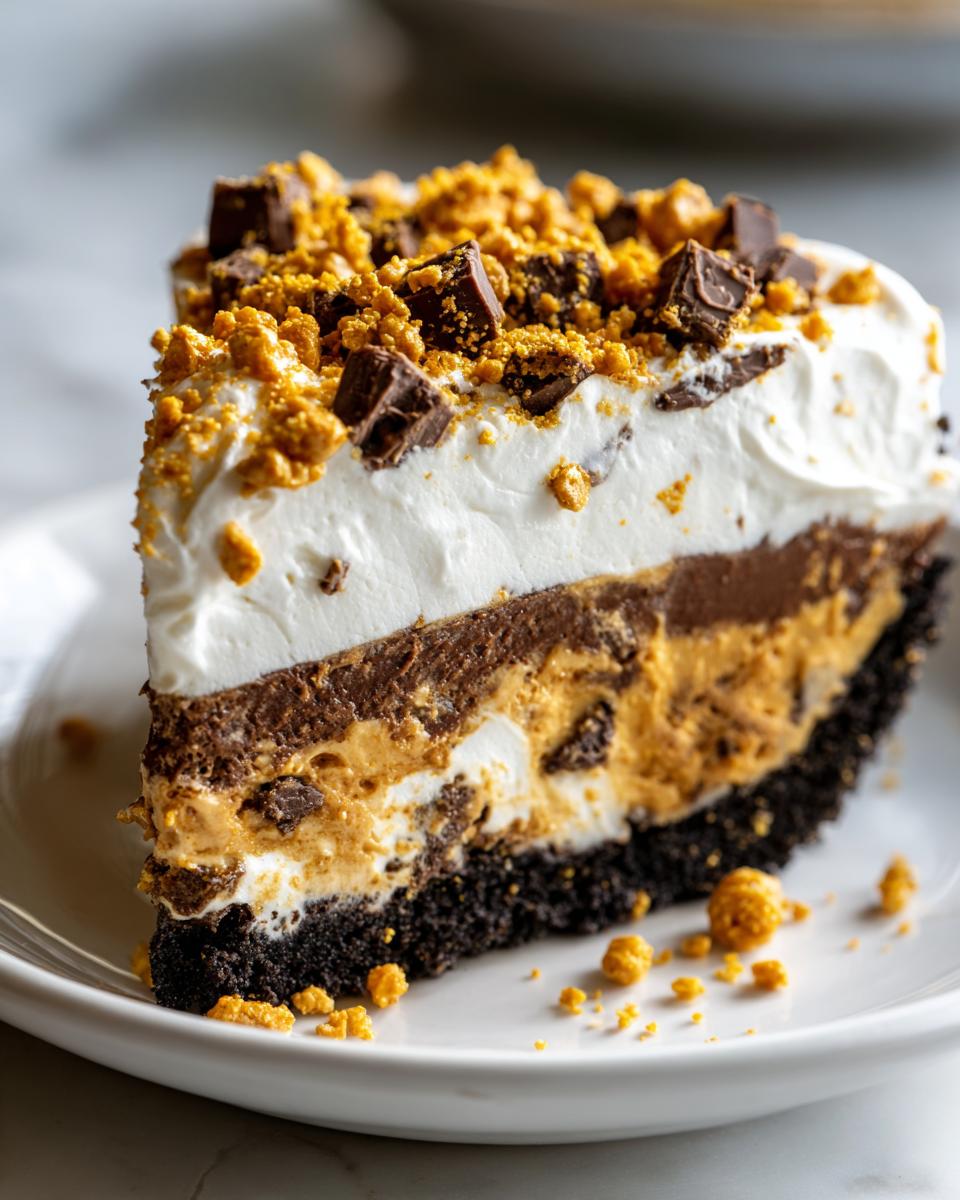
- Perfect Layers of Flavor: We get the deep cocoa note from the crust, the salty-sweet peanut butter filling, and then that recognizable Butterfinger punch on top. It’s balanced perfection!
Essential Ingredients for Your Creamy Peanut Butter Dessert
Okay, the magic behind this simple treat is that we are using ingredients everyone already has on hand, nothing fancy required—except the candy, of course! Since this is a No Bake Candy Bar Pie, we are relying on chilled fats and sugar for structure, not flour and eggs, so the quality of the dairy really shines through. If you want to see another way I use peanut butter, you absolutely have to check out my recipe for that amazing peanut butter dip!
You’ll separate your ingredients into three groups: the crust, the star filling, and the cloudy topping. For the crust, we rely on chocolate cookie crumbs—I use about 25 Oreos pulsed fine—mixed with six tablespoons of melted butter. For the filling, make sure that eight ounces of cream cheese is nice and soft, and have one cup of creamy peanut butter ready to go. We also need a full cup of powdered sugar for that filling!
Now for the texture! You’ll use a total of a cup and a half of crushed Butterfinger bars, but remember, we use them in two different spots, so keep them divided. And finally, that luscious layer on top starts with one and a half cups of cold heavy whipping cream, mixed with a little extra sugar and vanilla to make wonderful stiff peaks. If you’re out of Oreos, don’t panic! You can totally swap that chocolate crust for the same amount of graham cracker crumbs with just a touch less butter, per the suggestion notes.
Equipment Needed for a Perfect No Bake Candy Bar Pie
Since we aren’t turning on the oven for this slice of heaven, we don’t need heavy-duty pans or specialized baking gear. That’s part of the fun! But you do need a few essentials to handle that creamy filling and build those gorgeous layers. Having the right tools makes getting that smooth texture much, much easier.
First up, you absolutely need a standard 9-inch pie plate. Don’t try to make this in a springform pan or anything weird; the crust needs to set right up against that smooth edge! For mixing, grab at least two large mixing bowls, especially since one is dedicated to whipping the heavy cream without any greasy residue getting in the way.
You’ll rely heavily on an electric mixer—handheld or stand, whatever you have! It’s crucial for getting the cream cheese base silky smooth and for whipping that heavy cream up into stiff, dreamy peaks. Don’t forget a sturdy rubber spatula for gentle folding later on. Oh, and for the candy bar prep? Throw those poor Butterfingers into a sturdy zip-top plastic bag and let your rolling pin (or your frustration!) do the heavy crushing work. A little elbow grease makes this Quick & Creamy Dessert assembly so much simpler!
Step-by-Step Instructions for Your Butterfinger Pie
Alright, let’s get this amazing dessert into the fridge so it can set up! It’s all about layering textures here, from the firm base to the fluffy topping. Remember, since it’s no-bake, timing matters in terms of chilling, not cooking time. When you are crushing those Butterfingers, tuck them into a durable plastic bag and just tap them gently with a rolling pin or the bottom of a heavy pan until they are nicely broken up—not totally powdered, just good chunks!
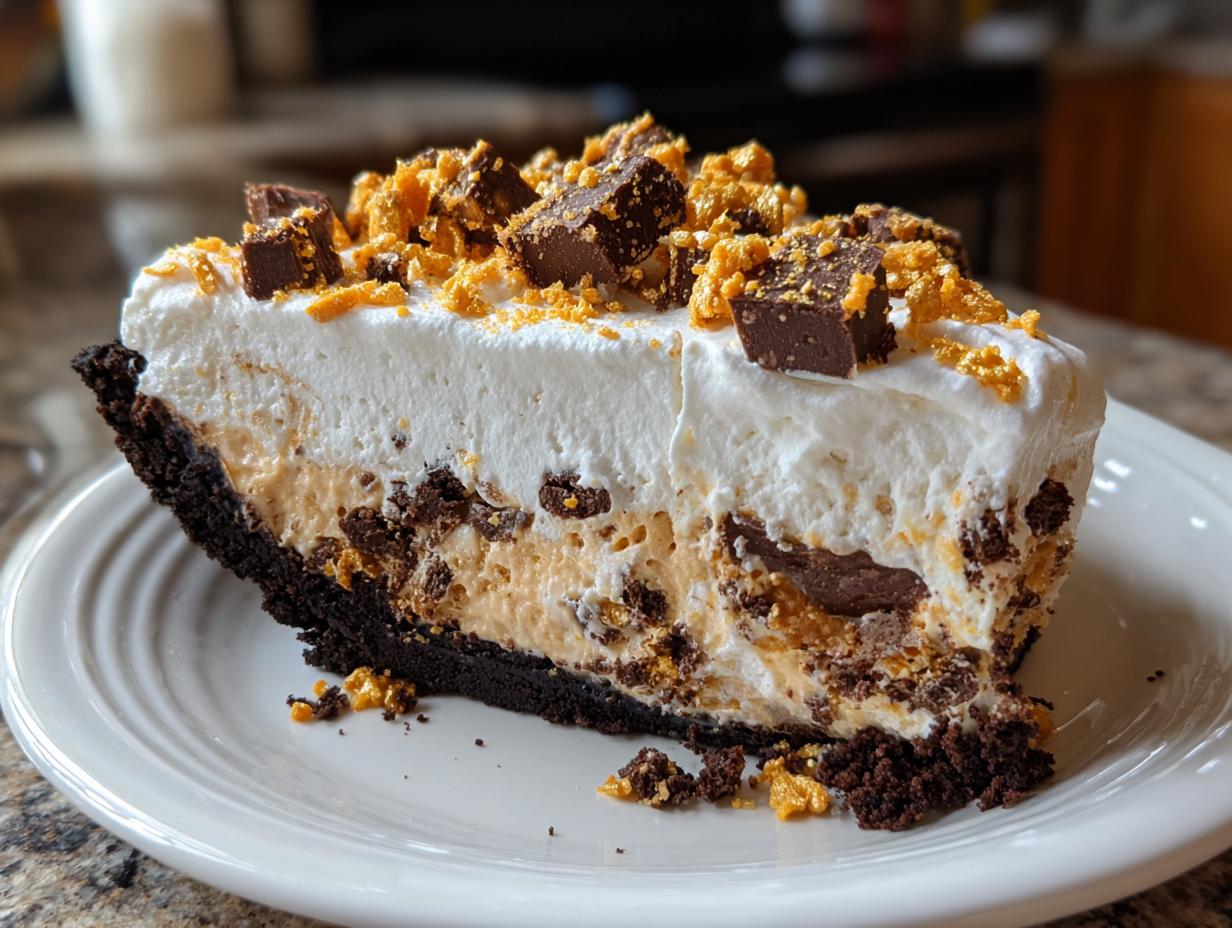
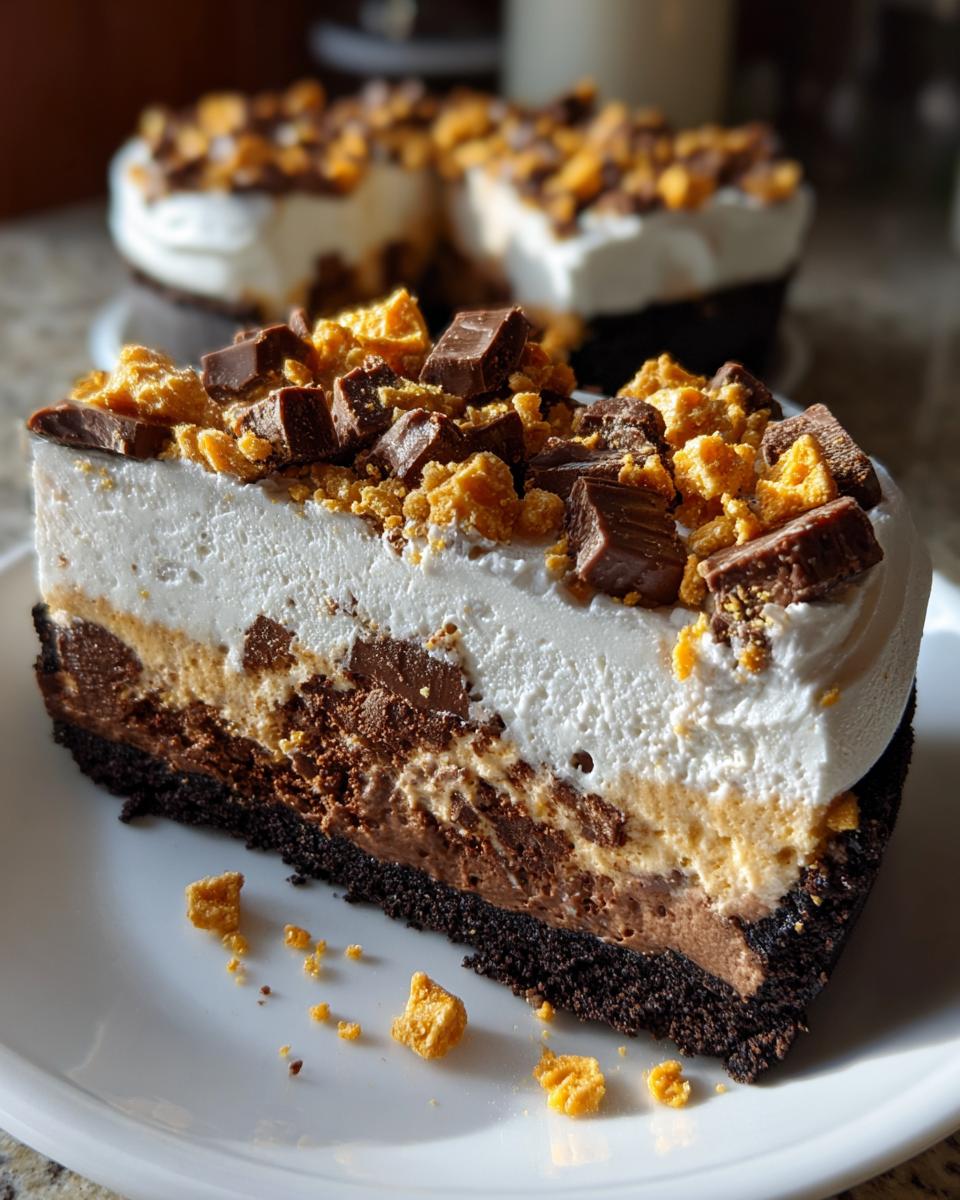
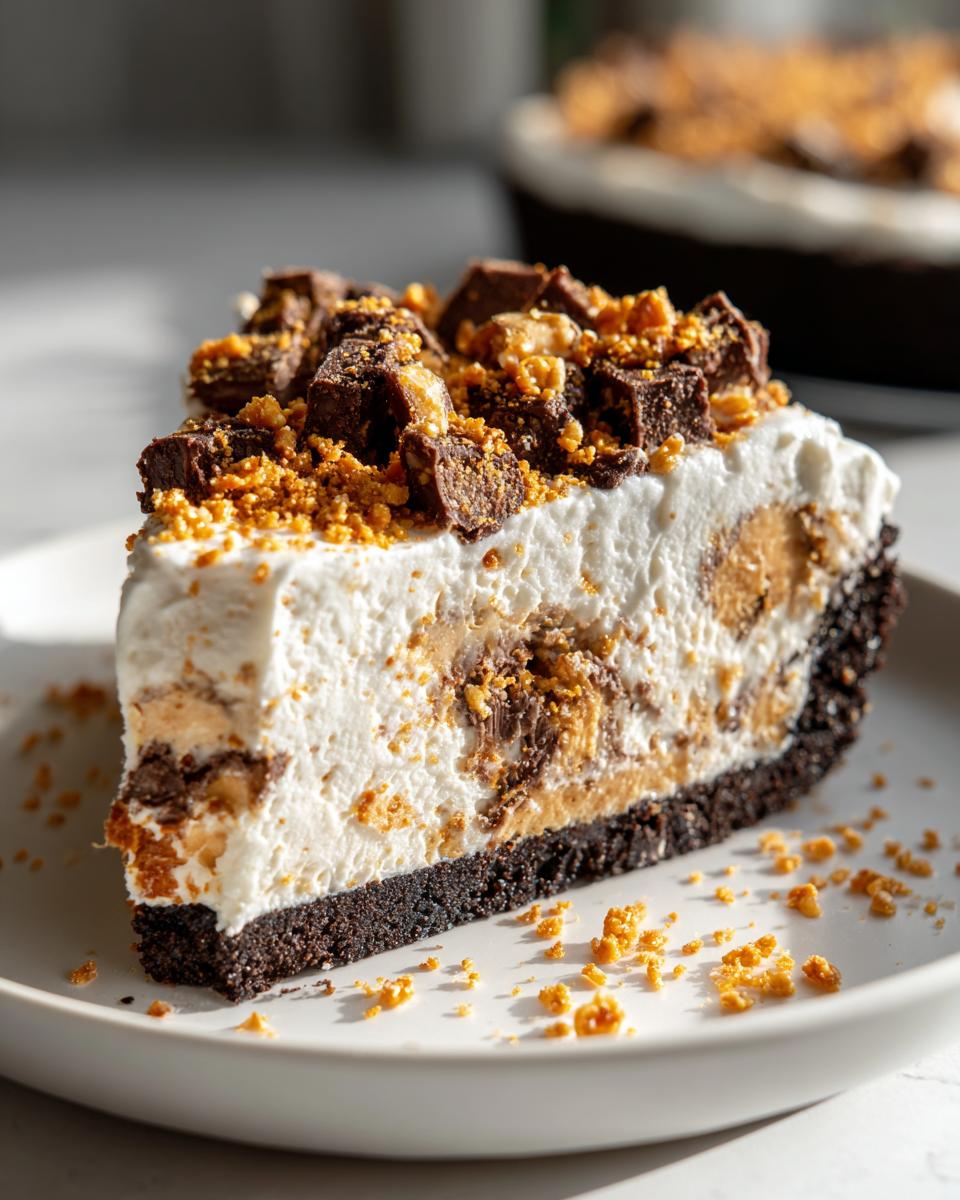
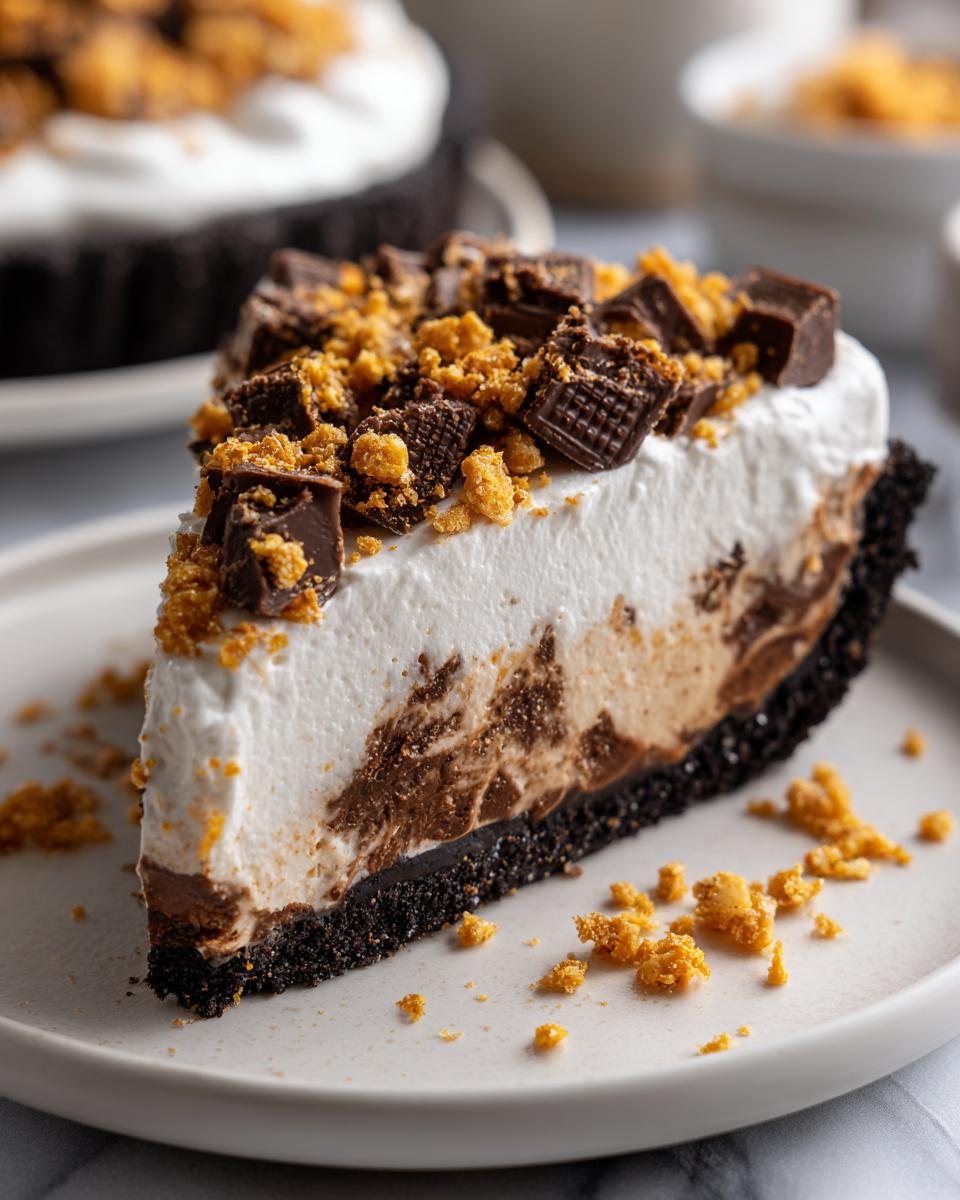
Preparing the Chocolate Crust Base
First, get that chocolatey foundation ready. In a medium bowl, you’re just mixing your chocolate cookie crumbs (remember, I love the Oreo ones!) with the six tablespoons of melted butter. You want everything evenly moistened, like wet sand. Then, press that mixture firmly into the bottom and slightly up the sides of your 9-inch pie plate. Don’t be shy; press it down hard so it holds together when you slice it later! Pop that plate straight into the freezer while you handle the filling. That chill time is crucial!
Creating the Creamy Peanut Butter Filling
Now for the star of the show—the Creamy Peanut Butter Dessert layer! Take your softened cream cheese and beat it until it’s totally smooth; you don’t want any lumps hiding in there. Now, beat in that full cup of powdered sugar, followed by the cup of creamy peanut butter. Keep mixing until it’s incredibly combined and looks beautifully thick. Stir in that teaspoon of vanilla extract. Once that base is perfect, gently fold in one full cup of your crushed Butterfinger candy bars. Folding keeps the mixture light, so take your time here!
Whipping Cream and Assembling the Butterfinger Pie
In a separate, super-chilled bowl, whip your cold heavy cream with that extra half-cup of powdered sugar and vanilla until you get strong, stiff peaks. This is what gives the pie its airy height! Now, take about half of the whipped cream and gently fold it into your peanut butter mixture—we don’t want to deflate all that air we just beat in. Carefully spread this blended filling into your chilled cookie crust. Then, top that layer with the rest of the plain whipped cream. For the grand finale, sprinkle the remaining half-cup of crushed candy over the very top. If you want extra drizzle like I do sometimes, use some chocolate syrup now. Then, the hardest part: stick the whole butterfinger pie in the fridge for at least four hours, but honestly, overnight is best. If you’re looking for other showstopping make-ahead desserts, I’ve got an easy no-bake eclair cake recipe that also freezes beautifully!
Tips for the Best No Bake Butterfinger Pie
Since this pie relies on chilling rather than baking, the temperature of your ingredients is everything! If your cream cheese is too cold when you start, you’ll end up with small chunks in your peanut butter layer, no matter how long you beat it. Always let that cream cheese sit out until it’s truly soft.
For the whipped cream, make sure your mixing bowl and the whisk attachment are cold—I even toss mine in the freezer for ten minutes! That helps the heavy cream whip up into firm, stable peaks fast. You need those stiff peaks to hold up the topping and keep the pie looking gorgeous.
Remember that crust swap I mentioned? If you decide to use a graham cracker crust instead of the chocolate cookies, just keep in mind you’ll need slightly less melted butter, about 1/3 cup instead of 6 tablespoons, to get that perfect pressable texture. And if you want the absolute creamiest result, you can always peek at my creamy cheesecake recipe for tips on achieving that smooth, cool texture!
Making Your Butterfinger Pie Ahead of Time
This is one of my absolute favorite things about this pie. It’s a total Make Ahead Dessert champion! Because it has no gelatin or traditional baking stages that can dry out, the chilling process actually *improves* the texture overall.
You have to let this butterfinger pie set up for a minimum of four hours in the refrigerator. That allows the peanut butter filling to firm up against that icy cold crust and keeps the layers from sliding apart when you go to slice them. Honestly, though, I never bother with only four hours. If you can stand it, wait until the next day!
When you chill this pie overnight, the crumbs in the crust absorb just a tiny bit of moisture from the filling, making the crust tender instead of brittle, and it allows all those rich peanut butter and chocolate flavors to really marry beautifully. You can safely store this pie in the fridge, covered tightly with plastic wrap, for up to three days. It tastes just as fantastic on day three as it does fresh out of the freezer after chilling! It’s perfect for holiday parties or weekend potlucks because you made it yesterday—trust me, you want to check out how I handle other make-ahead dishes when I share my recipe for the 7-layer salad.
Serving Suggestions for Your Crunchy Candy Dessert
Because this pie is already so rich—we’ve got peanut butter, chocolate crumbs, and candy bar crunch packed into every bite—you don’t need much to round out the experience. Sometimes, the best thing you can serve it with is nothing but a fork and a happy smile!
But if you really want to dress it up for company, I have a few simple tricks that balance out the heaviness perfectly. Anything too sweet will just make everything overwhelming, so leaning into something slightly acidic or bitter is the way to go. A hot cup of strong, black coffee is my absolute favorite partner for this pie. The bitterness of the coffee just cuts right through that creamy peanut butter filling and makes you ready for the next bite immediately.
If you are serving it for a springtime gathering or a lighter dessert occasion, a small handful of fresh berries on the side works wonders. Strawberries are nice, but raspberries offer that beautiful tartness that really wakes up your palate after that rich chocolate crust. For an extra touch of decadence, especially if you didn’t drizzle chocolate syrup on top before chilling, just melt a few chocolate chips and drizzle lightly over the slice right before serving. Oh, and if you’re looking for a delicious, unique drink to serve alongside it, check out how I make my strawberry matcha latte!
Frequently Asked Questions About Making Butterfinger Pie
I get so many questions about this recipe because everyone wants their Butterfinger Pie to be perfectly creamy and crunchy, just like mine! Here are a few things folks always ask me when they are getting ready to mix up this amazing treat.
Can I use Cool Whip instead of heavy whipping cream?
Oh, honey, you absolutely can! If whipping cream seems like too much fuss, or if you just prefer that stabilized texture, using a 12-ounce tub of frozen whipped topping (like Cool Whip) works great. Just make sure it’s thawed totally in the fridge before you start. You should fold in the entire container when the recipe calls for folding in the whipped cream. It makes for an even fluffier, lighter filling, though it won’t have that same fresh dairy richness, of course. It’s a fantastic shortcut for a Quick Dessert for Parties!
Is a graham cracker crust okay for this recipe?
Yes, definitely! I personally prefer the deep chocolate flavor of the Oreo crust against the peanut butter, but a graham cracker crust works beautifully too. When you swap them out, remember what I mentioned in the tips: you’ll need about 1 3/4 cups of graham cracker crumbs instead of the cookie crumbs, and you usually only need about 1/3 cup of melted butter to bring them together. It shifts the flavor profile from being strictly chocolate-peanut butter toward a more classic peanut butter pie vibe. Either way, it remains a top-tier No Bake Candy Bar Pie!
How long will this pie last in the fridge?
Because this is a Make Ahead Dessert and contains no eggs that need cooking, it lasts quite well in the refrigerator. I’ve found that the flavor and texture are best within the first 48 hours. You can safely store it covered tightly for up to three days. After that, the cookie crust starts getting a little soft from the moisture, which isn’t awful, but it loses that initial satisfying crunch. It never lasts that long at my house anyway!
My filling seems too soft after chilling. What did I do wrong?
This usually comes down to one of two things! Either your cream cheese wasn’t truly softened enough when you started, leading to a filling that didn’t integrate properly, or you didn’t let it chill long enough. This pie needs serious chill time. If you rush it, the filling stays too soft for proper slicing. If you suspect it’s still too soft after chilling, just pop it back in the freezer for about 30 minutes to firm things up before slicing. It’s all about getting that perfect density for that beautiful, Indulgent Sweet Treat slice!
If you’re looking for other easy solutions to kitchen dilemmas, I’ve put together some great advice on making the smash burger sauce!
Estimated Nutrition for This Indulgent Sweet Treat
Just so you know what you’re getting into with this delightfully decadent dessert, here is an estimated breakdown of the nutrition facts based on my standard recipe. Remember, I’m a home cook, not a lab, so these numbers are a good guideline but will change based on the brands of peanut butter and candy bars you use!
- Serving Size: 1 slice
- Calories: 450
- Sugar: 35g
- Sodium: 300mg
- Fat: 30g
- Saturated Fat: 12g
- Unsaturated Fat: 18g
- Trans Fat: 0g
- Carbohydrates: 40g
- Fiber: 1g
- Protein: 6g
- Cholesterol: 45mg
This is certainly designed to be an occasional indulgence, not an everyday staple, but goodness, is it worth it!
PrintEasy No-Bake Butterfinger Pie

Make this rich, creamy no-bake Butterfinger Pie featuring a chocolate cookie crust and a smooth peanut butter filling loaded with crunchy candy pieces. It is a quick dessert perfect for parties.
- Prep Time: 20 min
- Cook Time: 0 min
- Total Time: 4 hr 20 min
- Yield: 8 servings 1x
- Category: Dessert
- Method: No-Bake
- Cuisine: American
- Diet: Vegetarian
Ingredients
- 1 1/2 cups chocolate cookie crumbs (about 25 Oreo cookies)
- 6 tablespoons unsalted butter, melted
- 8 ounces cream cheese, softened
- 1 cup powdered sugar
- 1 cup creamy peanut butter
- 1 teaspoon vanilla extract
- 1 1/2 cups heavy whipping cream, cold
- 1/2 cup powdered sugar (for whipped cream)
- 1 teaspoon vanilla extract (for whipped cream)
- 1 1/2 cups crushed Butterfinger candy bars, divided
- Optional: Chocolate syrup for drizzling
Instructions
- Prepare the crust: Mix the chocolate cookie crumbs and melted butter in a bowl until the crumbs are evenly moistened. Press this mixture firmly into the bottom and up the sides of a 9-inch pie plate. Place the crust in the freezer while you prepare the filling.
- Make the peanut butter filling: In a large bowl, beat the softened cream cheese until smooth. Add 1 cup of powdered sugar and the creamy peanut butter. Beat until fully combined and creamy. Stir in 1 teaspoon of vanilla extract.
- Fold in candy: Gently fold in 1 cup of the crushed Butterfinger candy bars into the peanut butter mixture.
- Prepare the whipped cream: In a separate, chilled bowl, beat the cold heavy whipping cream with 1/2 cup of powdered sugar and 1 teaspoon of vanilla extract until stiff peaks form.
- Assemble the pie: Gently fold about half of the whipped cream into the peanut butter mixture until just combined. Spread this filling evenly into the chilled cookie crust.
- Top the pie: Spread the remaining whipped cream over the peanut butter layer. Sprinkle the remaining 1/2 cup of crushed Butterfinger candy bars over the top. Drizzle with chocolate syrup, if desired.
- Chill: Refrigerate the pie for at least 4 hours, or preferably overnight, to allow it to set completely before slicing and serving.
Notes
- For the easiest crust, pulse whole Oreo cookies in a food processor until fine crumbs form.
- If you prefer a graham cracker crust, substitute 1 3/4 cups of graham cracker crumbs for the chocolate crumbs and use 1/3 cup of melted butter.
- Crush the Butterfinger bars by placing them in a sealed plastic bag and hitting them lightly with a rolling pin or the bottom of a heavy pan.
Nutrition
- Serving Size: 1 slice
- Calories: 450
- Sugar: 35g
- Sodium: 300mg
- Fat: 30g
- Saturated Fat: 12g
- Unsaturated Fat: 18g
- Trans Fat: 0g
- Carbohydrates: 40g
- Fiber: 1g
- Protein: 6g
- Cholesterol: 45mg