

There is nothing, absolutely nothing, quite like the smell that fills your house when you pull a beautiful, steaming loaf of homemade bread out of the oven. It’s pure comfort, right? If you’ve been scared off by complicated kneading machines or dense, brick-like loaves in the past, don’t you worry for a second. I’ve perfected the ultimate strategy for making the soft and fluffy 100% whole wheat bread you dream about, and we’re using an easy, practically hands-off no-knead method to get there. My goal here at Chefsily, built on my belief in simple, wholesome food, is to get you baking with confidence. This healthy bread recipe proves that truly wonderful whole wheat bread doesn’t require hours of physical labor!
- Why This Soft & Fluffy Whole Wheat Bread Recipe Works for Everyone
- Gathering Ingredients for Your Honey Whole Wheat Bread
- Step-by-Step Instructions for Easy Whole Wheat Loaf
- Baking Tips for a Rustic Whole Grain Bread with a Crispy Crust
- Tips for Success When Making Whole Wheat Bread
- Storing and Reheating Your Fresh Baked Bread
- Serving Suggestions for Wholesome Homemade Bread
- Frequently Asked Questions About Making Whole Wheat Bread
- Nutritional Estimates for This Whole Wheat Sandwich Loaf
Why This Soft & Fluffy Whole Wheat Bread Recipe Works for Everyone
Look, I get it. People think baking with 100% whole wheat flour means saying goodbye to fluffiness forever. Not true! This easy whole wheat loaf is the friendly introduction to serious home baking you’ve been looking for. It’s practically foolproof, which is why it’s perfect for beginner bread baking.
- It relies on time, not muscle. You get amazing results without standing there kneading for ages.
- It delivers that beautiful, hearty flavor of whole grains without the heaviness you usually find.
- It uses honey for a hint of natural sweetness that just sings next to the earthy wheat flavor.
Achieving 100 Percent Whole Wheat Baking Success
The secret here is teamwork between the yeast and the long rest period. When we use 100 percent whole wheat flour, we can’t rush the process, or it gets heavy. The reason this no-knead method shines is that the long rise time lets the flour fully hydrate. Just make absolutely sure your water is in that 105°F to 115°F range when you wake up your yeast. Too cold, and it sulks; too hot, and you kill it before we even start! That warm start is non-negotiable for success.
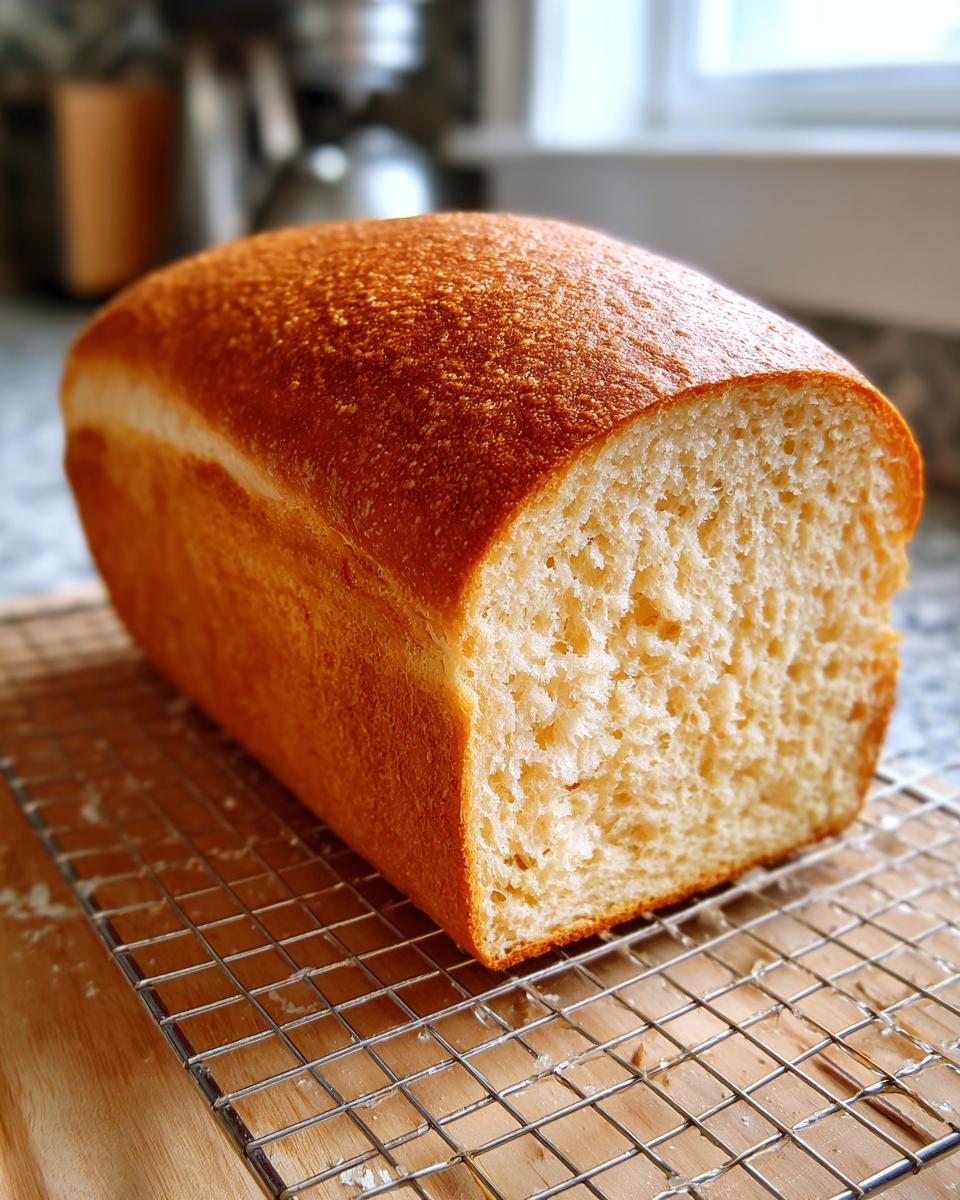
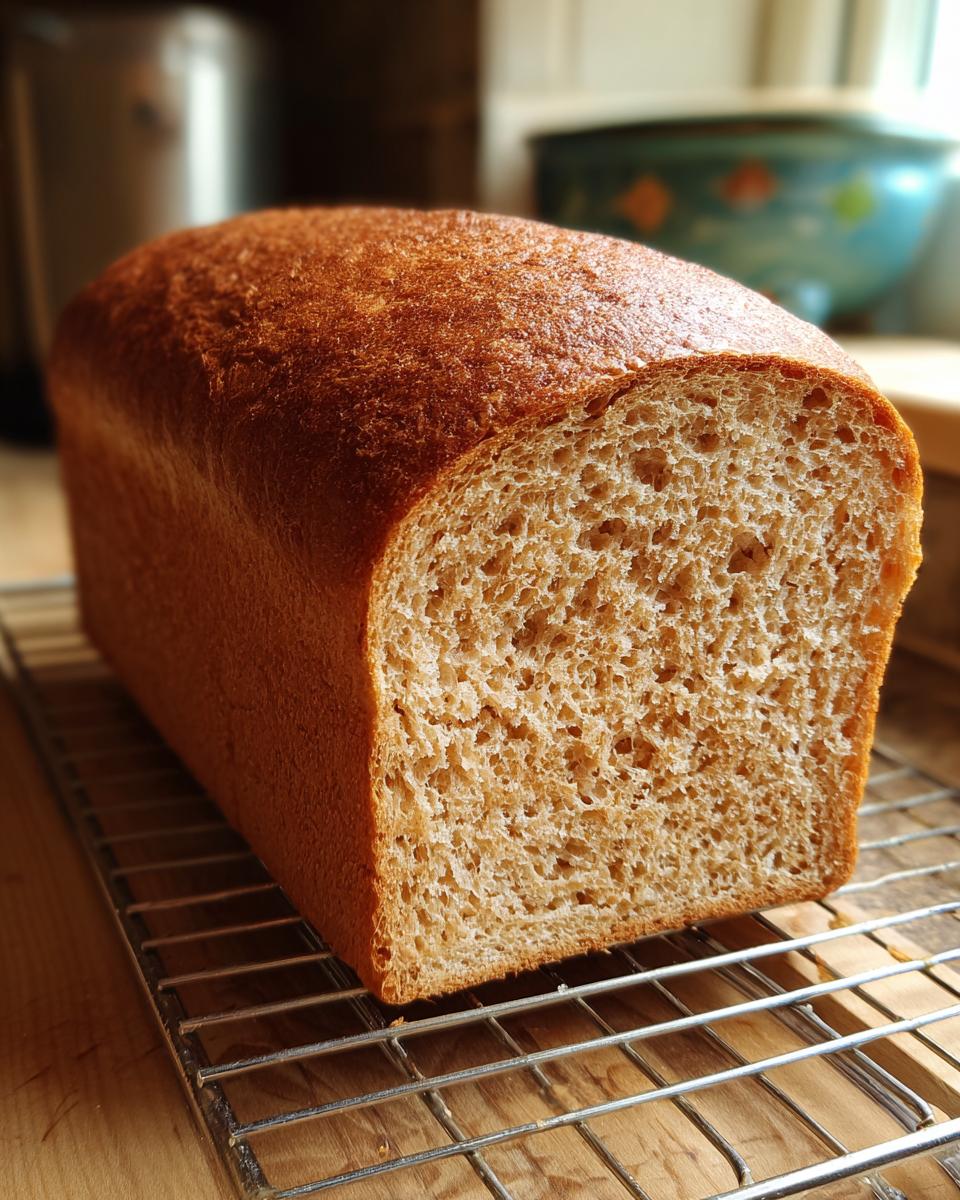
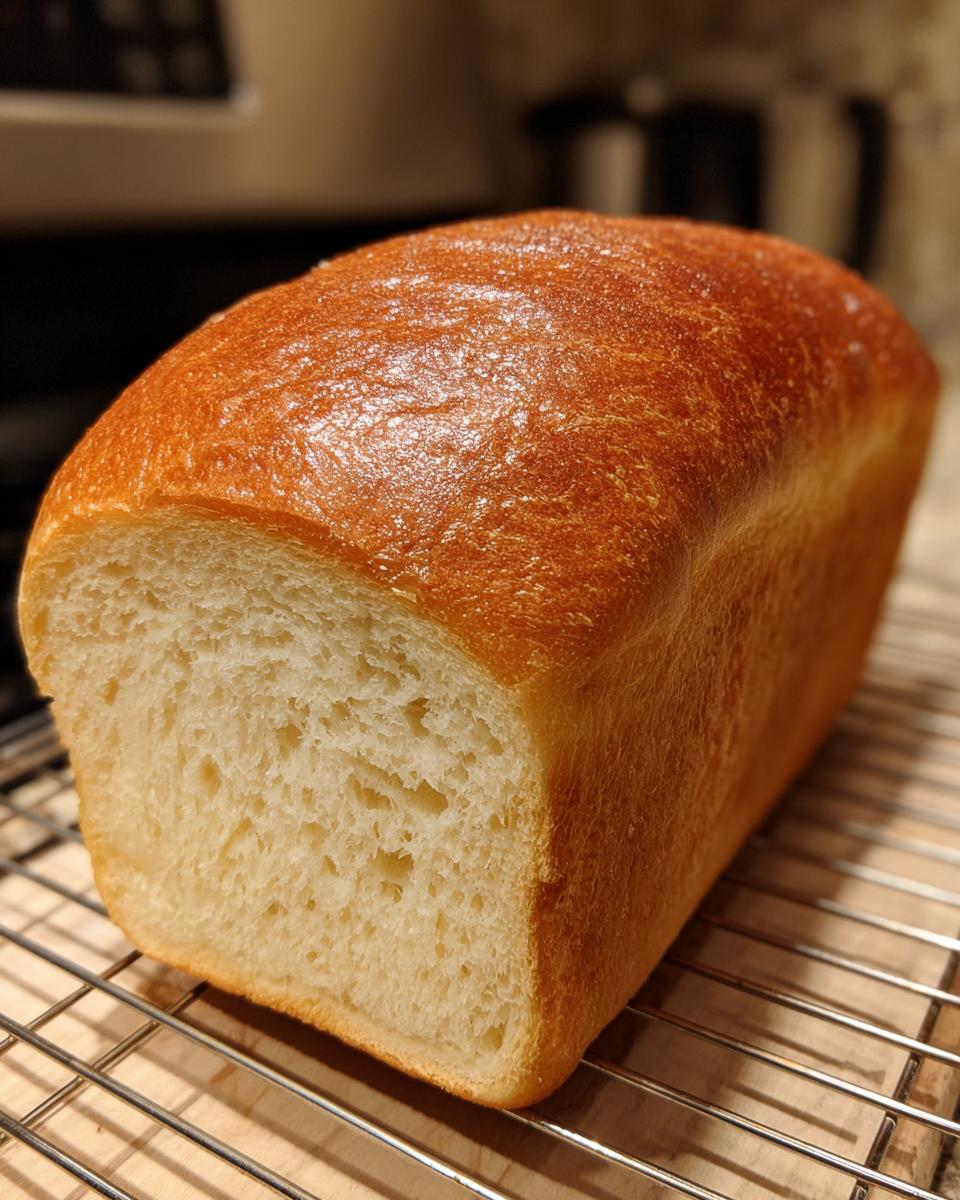
Perfect Texture for a Whole Wheat Sandwich Loaf
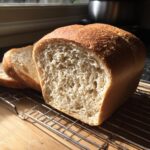
We are absolutely skipping that dry, crumbly texture you sometimes get with dense whole grain loaves. This recipe is specifically engineered to give you that pillowy, soft sandwich bread interior. It slices beautifully—no crumbling on the counter! You finally get that soft sandwich bread you crave, but healthier, because it’s entirely whole wheat. Trust me, once you nail this, you’ll be making it weekly.
Gathering Ingredients for Your Honey Whole Wheat Bread
Baking success starts right here, with accurate measuring! Because we are working with 100% whole wheat flour, which behaves a bit differently than white flour, hitting these measurements precisely is how we guarantee that soft, fluffy payoff. Get everything ready on your counter—this is called mise en place, and it keeps things calm when the oven starts getting hot!
Ingredient Clarity for Perfect Whole Wheat Bread
I’ve made this loaf dozens of times, and here are the non-negotiable details you need to know before you start mixing this wholesome homemade bread.
- Water: This has to be warm, not hot! Aim for 105°F to 115°F. If you don’t have a thermometer, it should feel like warm bath water—comfortable to your wrist. This wakes up the yeast beautifully.
- Flour: You must use 3 1/2 cups of 100% whole wheat flour. This recipe isn’t designed to handle white flour swaps without adjusting liquids, so stick to the real deal for this first run!
- Honey: We are using a scant 1/4 cup of honey here. It pulls moisture into the dough and adds that lovely, subtle sweetness we associate with the best whole wheat bread.
- Salt: Just a teaspoon and a half—don’t skip it, it pulls all the nutty wheat flavors forward!
Step-by-Step Instructions for Easy Whole Wheat Loaf
Okay, let’s get our hands dirty—well, maybe just a little bit! Since this is a simple whole wheat bread recipe, the hands-on time is minimal, but the results are maximum flavor. We’re relying completely on that yeast to do the heavy lifting for us, which is why following these steps precisely gets you the best whole wheat bread every single time.
Activating the Yeast and Mixing the Whole Wheat Bread Dough
First things first: we need to wake up that yeast. Pour your warm water into a big bowl—I mean really big, because this dough expands! Sprinkle in the yeast and let it hang out for about five minutes until it gets foamy. That foam tells you it’s ready to work its magic. Next, stir in your honey and that lovely olive oil. Now, grab your pre-whisked flour and salt mixture. Add those dry bits gradually while mixing with a sturdy wooden spoon. Stop stirring the second everything comes together into what I call a “shaggy mess.” Seriously, don’t try to make it smooth; for this no-knead bread, shaggy is perfect!
The Crucial First Rise for Fluffy Whole Wheat Recipe
This is where your patience pays off! Cover that bowl, seal it up tight with plastic wrap or a damp kitchen towel, and stash it somewhere warm—like an oven that is turned OFF, or just a sunny corner of the kitchen. It needs a full 1 to 1.5 hours to rise. You are looking for the dough to have visibly doubled in size. It’s going to look puffy and full of air bubbles. If it looks the same as when you put it in, it’s too cold, so give it a little more time! This long rest is essential for getting that fluffy whole wheat recipe texture.
Shaping and the Second Proofing of Your Whole Wheat Sandwich Loaf
Time to gently prep our dough for its final home. Lightly oil your 9×5 loaf pan—don’t use parchment yet, we need the sides to grip slightly during the rise. Dust your counter lightly with flour and gently turn the dough out. Resist the urge to punch it down vigorously! Just ease it into a tight log shape by folding the edges in and rolling it up, making sure any seams are tucked underneath. Place that log seam-down into your oiled pan. Cover it loosely and let it relax for another 45 to 60 minutes. For the best result for your whole wheat sandwich loaf, you want the dough to crown about an inch over the rim of the pan before it goes into the oven.
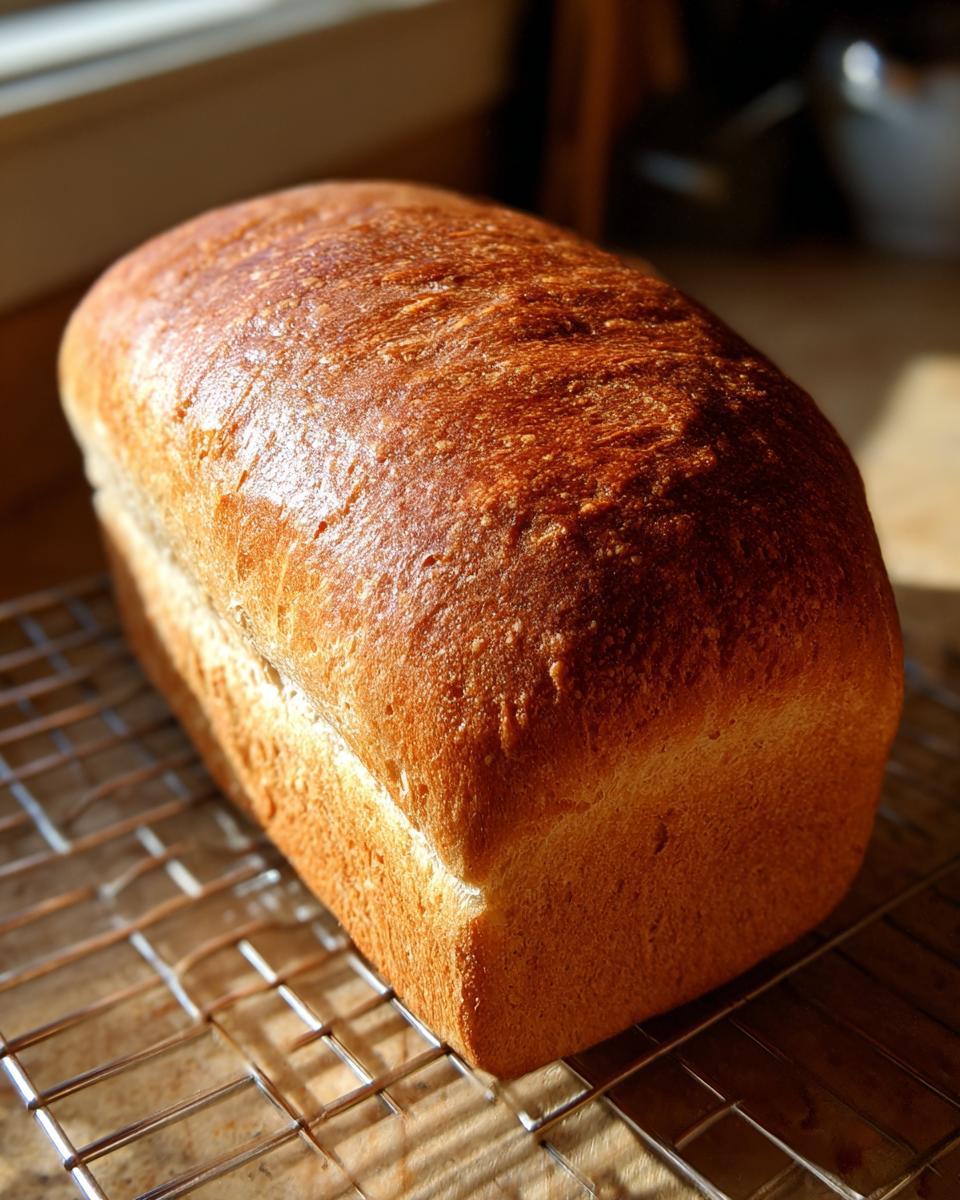
Baking Tips for a Rustic Whole Grain Bread with a Crispy Crust
When that second rise is done and your oven is preheated to 375°F, it’s time for the final magic trick! If you want that gorgeous, nutty flavor and that satisfying shatter when you bite into your loaf—I’m talking about a truly rustic whole grain bread moment—you absolutely need steam. Pop a small, shallow pan on the bottom rack of your oven while it preheats. Just before you slide the bread in, carefully pour about a cup of hot water into that pan. That burst of steam keeps the crust soft at the beginning, allowing the bread to get its full oven-spring before it hardens, giving you the best structure for your whole wheat bread.
Bake it for about 30 to 35 minutes. Don’t just rely on the color; we need to check the internal temperature, which is the real key to any successful homemade bread recipe.
Checking Doneness for Homemade Bread Recipes
Visually, you’re looking for a deep golden brown top. But the real pro move is grabbing an instant-read thermometer. Stick it into the center of the loaf—don’t touch the bottom of the pan! When that thermometer reads between 195°F and 200°F, you know you’ve cooked this wholesome loaf all the way through. Pull it out immediately and get it onto a wire rack to cool completely. If you slice it while it’s warm, your steam-created softness turns gummy, and we worked too hard for that!
Tips for Success When Making Whole Wheat Bread
Baking truly wholesome homemade bread is incredibly rewarding, but let me share something I learned the hard way when I was first really diving into baking with whole wheat flour. Early on, I tried substituting white flour ounce-for-ounce in a recipe meant for all-wheat, and my first loaf came out like a dense, beautiful doorstop. I thought I’d ruined the yeast, but the issue was hydration! Whole wheat flour just soaks up more liquid, so these little tweaks are critical for great results in your whole wheat bread.
Ingredient Substitutions for This Healthy Bread Recipe
While I preach sticking to the recipe the first time around, I know people play around with sweeteners. If you absolutely don’t have honey on hand for this healthy bread recipe, you can use maple syrup. Just remember, maple syrup is slightly thinner than honey, so your dough might feel a bit looser during the first rise. If you swap it in, just keep an eye on it—you might need to reserve just a tablespoon of your flour in case the dough seems too wet.
Also, please let that dough do the work during the rise times! That long rest is what makes this a superior, easy whole wheat loaf. Rushing the proofing process is the quickest way to end up with a dense product, no matter what flour you use. Be patient; that’s the secret ingredient in all great fresh baked bread!
Storing and Reheating Your Fresh Baked Bread
Oh, the temptation to slice into that beautiful, warm loaf right away! Hold on, though—this is critical for the texture of your fresh baked bread. You absolutely must let it cool completely on a wire rack, usually for at least an hour, maybe two for a hearty whole wheat loaf. Slicing it hot causes the steam inside to escape too fast, leading to a gummy texture that ruins all that beautiful no-knead work we did.
Once totally cool, this whole wheat bread keeps really well on the counter, wrapped tightly in plastic wrap or placed in a bread bag, for about three days. If you know you won’t finish it that quickly, freeze it! Slice the loaf first, then wrap the slices tightly in plastic wrap and place them in a freezer bag. It freezes beautifully for up to three months, and when you want toast, just pop a frozen slice right into the toaster!
Serving Suggestions for Wholesome Homemade Bread
This is the part I love most—thinking about how we get to eat this amazing loaf! While this whole wheat bread is fantastic holding up a hearty turkey sandwich or a thick slice of tomato—it really shines in simple preparations too. We are making wholesome food here, so let’s keep the pairings easy and delicious!
First off, if you have a slice slightly warm (but not hot enough to destroy the texture!), slathered with good quality salted butter, that’s heaven. But if you’re looking for ways to integrate this into your daily routine, think about using it for your healthy breakfast toast. It’s sturdy enough for mashed avocado and a fried egg without getting soggy one bit.
I also love making small squares of this bread and toasting them up lightly before serving them alongside my favorite soups or stews instead of just plain croutons. It adds such a satisfying, nutty bite to your bowl! Or, if you happen to be making a big batch of homemade guacamole, use these slices—they are far superior to chips for dipping, and it feels so much better fueling yourself with real grain!
Frequently Asked Questions About Making Whole Wheat Bread
When you’re diving into whole wheat bread, you naturally end up with questions! Baking is all about trial and error, but I want to give you the answers upfront so you can nail this loaf on your first try. Here are the things I always hear about making a soft, fluffy, 100% whole wheat loaf.
Can I use all-purpose flour instead of 100% whole wheat flour?
You certainly can, but then you’re not making this specific recipe anymore! If you substitute all-purpose flour, you’ll drastically change the hydration and the texture. This recipe relies on the heft of the whole wheat flour interacting with the honey and the long rise time to stay moist. If you want to use white flour, I suggest cutting back on the water by about 1/4 cup for every cup of white flour you swap in, otherwise, your dough will be too loose for this no-knead bread method.
Why did my homemade bread come out dense?
Ninety percent of the time, a dense loaf of homemade bread comes down to two things: yeast that wasn’t active enough (remember that warm water check!) or not letting the dough rise long enough. This no-knead method relies on time versus muscle. If your dough didn’t double during that first rise, it simply didn’t develop enough gas structure, resulting in that heavy, disappointing crumb. Give it more time in a warm spot!
Can I use instant yeast instead of active dry yeast?
Yes, you absolutely can! Instant yeast is super convenient. If you use instant yeast for this whole wheat sandwich loaf, you can skip step one entirely—the activation step. Just mix the instant yeast directly into your dry ingredients (the flour and salt) before adding the wet ingredients. It will still proof perfectly fine during the first long rise. That’s a great time-saver for your easy whole wheat loaf!
How do I get the best crumb without kneading?
The structure comes from the hydration and the long rest. Since we aren’t building gluten by kneading, the slow, natural activation of the whole wheat flour absorbing the liquid is what builds the necessary network. When you cover it during that very long first rise, you are essentially creating a humid environment where the gluten can relax and strengthen without any physical manipulation from you. That’s the magic of a good soft sandwich bread recipe!
Nutritional Estimates for This Whole Wheat Sandwich Loaf
You asked for wholesome, and this whole wheat bread delivers! It’s great knowing what you’re putting into your body when you bake from scratch. We are using simple, natural ingredients here, meaning no harsh preservatives or weird fillers that you find in the store-bought stuff. That gives me such peace of mind when I make this loaf for my family!
Here are the estimated nutritional facts based on the ingredients list for one slice of this delicious loaf. Remember, these numbers are just guidelines—they can change a tiny bit depending on exactly which brand of honey or olive oil you use, but they give you a fantastic baseline for planning those healthy breakfast toast meals.
- Serving Size: 1 slice
- Calories: 130
- Sugar: 3g
- Sodium: 180mg
- Total Fat: 2.5g
- Protein: 5g
- Fiber: 4g
See that fiber count? That’s the beauty of using 100% whole wheat flour! It gives you that sustained energy you want in a sandwich loaf. We made sure to keep the added sugar low by relying just on that small measure of honey. It’s a truly fantastic, healthy bread recipe that fits beautifully into any meal plan.
PrintThe Ultimate Soft & Fluffy 100% Whole Wheat Sandwich Bread (Easy No-Knead Method)
Bake a wholesome, soft, and fluffy 100% whole wheat sandwich bread loaf at home using this simple, no-knead method. This recipe uses honey for a touch of natural sweetness, making it perfect for everyday toast or hearty sandwiches.
- Prep Time: 20 min
- Cook Time: 35 min
- Total Time: 2 hours 50 min
- Yield: 1 loaf 1x
- Category: Baking
- Method: No-Knead Baking
- Cuisine: American
- Diet: Vegetarian
Ingredients
- 1 1/2 cups warm water (105-115°F)
- 2 1/4 teaspoons active dry yeast
- 1/4 cup honey
- 2 tablespoons olive oil
- 3 1/2 cups 100% whole wheat flour
- 1 1/2 teaspoons salt
Instructions
- Combine the warm water and yeast in a large bowl. Let it sit for 5 minutes until foamy.
- Stir the honey and olive oil into the yeast mixture.
- In a separate bowl, whisk together the whole wheat flour and salt.
- Gradually add the dry ingredients to the wet ingredients, mixing with a wooden spoon until a shaggy dough forms. Do not overmix.
- Cover the bowl tightly with plastic wrap or a damp towel. Let the dough rise in a warm place for 1 to 1.5 hours, or until it has doubled in size. This is the no-knead step.
- Lightly grease a 9×5 inch loaf pan. Gently turn the dough out onto a lightly floured surface. Shape it into a log and place it seam-side down into the prepared loaf pan.
- Cover the pan loosely and let the dough rise again for 45 to 60 minutes, or until it has crowned about 1 inch above the rim of the pan.
- Preheat your oven to 375°F (190°C) during the last 15 minutes of the second rise.
- Bake for 30 to 35 minutes, or until the top is golden brown and the internal temperature reaches 195-200°F.
- Remove the bread from the oven and immediately turn it out onto a wire rack to cool completely before slicing.
Notes
- For a slightly crispier crust, place a shallow pan of water on the bottom rack of the oven while preheating to create steam.
- If you prefer a less sweet loaf, reduce the honey to 2 tablespoons.
- This bread is excellent toasted for healthy breakfast toast the next day.
Nutrition
- Serving Size: 1 slice
- Calories: 130
- Sugar: 3g
- Sodium: 180mg
- Fat: 2.5g
- Saturated Fat: 0.4g
- Unsaturated Fat: 2.1g
- Trans Fat: 0g
- Carbohydrates: 24g
- Fiber: 4g
- Protein: 5g
- Cholesterol: 0mg