
Listen, there is just something magical about a treat that seems impossible but turns out to be ridiculously easy, right? That’s exactly how I feel when I pull a batch of truly soft, pillowy homemade marshmallows out of the oven. It feels like cheating! My philosophy, which Isabella Rossi brought to Chefsily, is that cooking should bring joy, not stress. And nothing generates joy like biting into one of these cloud-like sweets! We’re going to whip up what I call the Easy Homemade Marshmallow Recipe that guarantees that signature fluffy texture. Plus, if you’re avoiding corn syrup, I’ve got your perfect substitute ready to go. Trust me, once you try these, you’ll never look at the plastic bag in the grocery aisle the same way again. You can find more simple and joyful recipes like this in our collection of delicious dessert recipes.
- Why You Will Love Making Homemade Marshmallows
- Essential Equipment for Perfect Homemade Marshmallows
- Ingredients for the Easy Marshmallow Recipe
- How to Make Homemade Marshmallows Step by Step
- Setting and Cutting Your Homemade Marshmallows
- Tips for Gourmet Marshmallow Recipes and Variations
- Serving Suggestions for DIY Marshmallows for Hot Chocolate
- Storing Homemade Vanilla Sweets
- Frequently Asked Questions About Making Marshmallows
- Share Your Cloud-Like Dessert Creations
Why You Will Love Making Homemade Marshmallows
Sometimes, the best things in life are the ones you make yourself. It’s true for bread, and it’s *especially* true for these homemade marshmallows. You honestly won’t believe how much better the fresh result is compared to anything pre-packaged. I want you to look forward to making this, not dreading it!
- Achieving Cloud-Like Texture: This is the main event! We aren’t making chewy slugs here; we are aiming for that melt-in-your-mouth sensation. The secret to getting those perfectly fluffy marshmallows from scratch lies entirely in the whipping step. That long, high-speed beat creates thousands of tiny air pockets, giving you that gorgeous, weightless result every single time.
- It’s Easier Than You Think: I know candy making sounds intimidating, but this recipe really is straightforward. Once your syrup hits the right temperature, it’s just about letting the stand mixer do the heavy lifting. Seriously, if you can manage a whisk attachment, you can master this soft homemade candy.
- Simple Ingredients for Homemade Marshmallows: You only need a handful of pantry staples for the core recipe. Sugar, water, gelatin—that’s the base! And because I know some of you prefer to keep the corn syrup out of your kitchen, the ability to swap in honey or maple syrup makes these way more flexible than most gourmet recipes out there.
- Customizable Fun: These are the perfect base for future experiments. While our main recipe focuses on the best vanilla marshmallow recipe, you can easily pivot to holiday peppermint or fun birthday flavors just by swapping extracts at the very end. Think of this standard batch as your canvas!
Achieving Cloud-Like Texture
The magic word here is *volume*. When you see that mixture transform from a sticky liquid into a shiny, opaque mass in the mixer bowl, you know you’re winning. That 12 to 15 minutes of high-speed running is non-negotiable if you want that true cloud-like texture dessert. If you stop early, they’ll spread too much in the pan and end up dense, not dreamy. Be patient; let the mixer work!
Simple Ingredients for Homemade Marshmallows
We keep the core ingredient list intentionally short so you can focus on the technique. That way, you’re concentrating on the steps rather than hunting down obscure items. Having that easy no corn syrup option baked right into the ingredient list means everyone can enjoy these perfect homemade marshmallows.
Essential Equipment for Perfect Homemade Marshmallows
Okay, let’s talk gear. Making homemade marshmallows requires a couple of pieces of equipment that aren’t strictly necessary for making cookies, but they are absolute game-changers here. If you are missing one of these things, I honestly suggest waiting until you have it, because it will save you a huge headache later.
First up, you need a reliable stand mixer—the powerhouse of this operation. You absolutely cannot whip this mixture by hand for 15 minutes straight; your arm will fall off before you get that stiff peak! A sturdy stand mixer is what delivers that stunning cloud-like texture.
Second, and this is non-negotiable for candy making, you need a good, accurate candy thermometer. This is how we nail the soft-ball stage. Remember, cooking sugar is a science! If your syrup is too cool, your easy marshmallow recipe will turn into a sticky puddle. If it’s too hot, you’ll have rock candy instead of soft treats.
Finally, have your 8×8 inch pan ready *before* you even start heating the water. Since the marshmallow fluff sets up so fast once it starts cooling, you need that pan greased and dusted perfectly. Have your spatula ready to go—we move quickly when the whipping stops!
Ingredients for the Easy Marshmallow Recipe
Now we get to the fun part: gathering our supplies! The ingredient list for these homemade marshmallows is surprisingly short, which really proves that simple ingredients make the best homemade dessert recipes. We’re covering the main batch and, very importantly, what you need to stop the finished sweets from sticking to everything you own!
For the main marshmallow body, you will need:
- 1 cup cold water, split into two parts—1/4 cup for the gelatin and 3/4 cup for the syrup.
- 1 cup standard granulated sugar.
- 1 cup light corn syrup. BUT WAIT! If you’re looking for that making marshmallows without corn syrup solution, substitute this with 3/4 cup of honey *or* 3/4 cup of maple syrup. Both work beautifully, though they might slightly alter the pure vanilla flavor profile.
- 1 full packet of unflavored gelatin (that’s usually about 2 1/4 teaspoons, check your packet!).
- 1 teaspoon of real, pure vanilla extract. Don’t skimp here; this is where the flavor really shines!
These ingredients are what produce that beautiful, light texture. If you want to know more about mastering vanilla in baking, check out my tips on getting the most flavor from vanilla in my vanilla cupcakes post.
For Dusting: Preventing Sticky Homemade Marshmallows
This step, my friends, is the difference between clouds of fluffy joy and one giant, sticky sugar blob that you have to chisel out of the pan. We need a dusting mixture to coat the pan and the final product later. This is what keeps your soft homemade candy from fusing to itself.
You will mix together:
- Confectioners’ sugar (powdered sugar).
- Cornstarch.
The goal is a very heavy, almost snowy coating everywhere! I usually do a 50/50 blend, but you could lean heavier on the cornstarch if you want less sweetness on the exterior. Generously dust the pan *before* you start mixing the syrup. You cannot over-dust this part, believe me!
How to Make Homemade Marshmallows Step by Step
Alright, here we go! This is where the magic truly happens. Don’t let the sugar part scare you; if you follow these steps for our easy marshmallow recipe exactly, you’ll nail that perfect, plush texture. The goal here is to get a beautiful, stable structure that sets up just right. It’s a little bit of science, a whole lot of patience, and definitely requires paying attention to your thermometer. If you want to see how I handle mixing sugar in other recipes, take a peek at my guide for easy candied sweet potatoes; the principles of dissolving sugar are similar!
Blooming Gelatin and Preparing the Pan
Before we even turn on the stove, we have to set the stage! First, grab that 8×8 pan and generously grease it. I mean *really* grease it, because the marshmallow fluff will cling to anything dry. Once greased, dust it heavily with your reserved powdered sugar/cornstarch mixture. Shake out the excess, but make sure the bottom and sides look snow-covered. This layer is your insurance policy for easy release later.
Next, the gelatin needs to wake up! Take that 1/4 cup of cold water and sprinkle the gelatin evenly over the top. Don’t stir it! Just let it sit there for about 5 to 10 minutes. When it gets spongy, we call that “blooming,” and it ensures the gelatin dissolves smoothly into the hot syrup without any nasty clumps.
Cooking the Syrup to Soft-Ball Stage
Time to build flavor! In a small saucepan, combine the remaining 3/4 cup of water, the sugar, and either your corn syrup or your substitute (honey or maple syrup). Heat this over medium heat, stirring only until the sugar disappears. Once it’s simmering and clean, stop stirring immediately. You don’t want sugar crystals splashing up the side of the pan—that can ruin the whole batch!
Now, you must use that candy thermometer! Cook that boiling mixture until it hits precisely 240 degrees Fahrenheit. That temperature is the soft-ball stage, and it’s the absolute sweet spot for achieving soft homemade marshmallows. As soon as that thermometer reads 240°F, yank it off the heat. Don’t let it linger for even a second!
Whipping for Fluffy Marshmallows from Scratch
Head straight for your stand mixer, where your bloomed gelatin is waiting. Turn the mixer on low speed just to soften the gelatin slightly, then start slowly pouring that hot syrup down the side of the bowl. My biggest tip here, channeling my inner Italian nonna: don’t let the syrup hit the whisk directly! Stream it slowly down the *side* of the bowl. This prevents hot sugar from spraying out, which is dangerous and messy.
Once it’s all in, crank that speed to high. This is where the work happens! You need to whip this mixture for a minimum of 12 minutes, but 15 minutes is even better for that gorgeous, fluffy marshmallows from scratch result. You’ll watch it go from clear and bubbly to thick, white, and shiny—it should look like glossy meringue. In the very last minute of whipping, pour in your vanilla extract. This high, long whip is what guarantees the light, whipped sugar candy tutorial texture we are aiming for. Don’t cheat this time; it’s worth every second!
Setting and Cutting Your Homemade Marshmallows
Okay, the mixer has done its job, and now we enter the waiting game—which is the hardest part for me because I want to eat them *right now*! Patience is a virtue, especially when making homemade marshmallows. You absolutely must let this slab set up properly. If you try to cut it while it’s still warm or overly soft, it will just deflate into a sticky mess, and all that lovely air we whipped into it will be gone.
I recommend leaving the pan untouched on the counter, uncovered, for at least four hours. Honestly, though? Overnight is my favorite way to do it. Allowing them to set at room temperature—not in the fridge, please!—ensures they have that beautiful, soft, chewy structure. Chilling them can sometimes make them too firm.
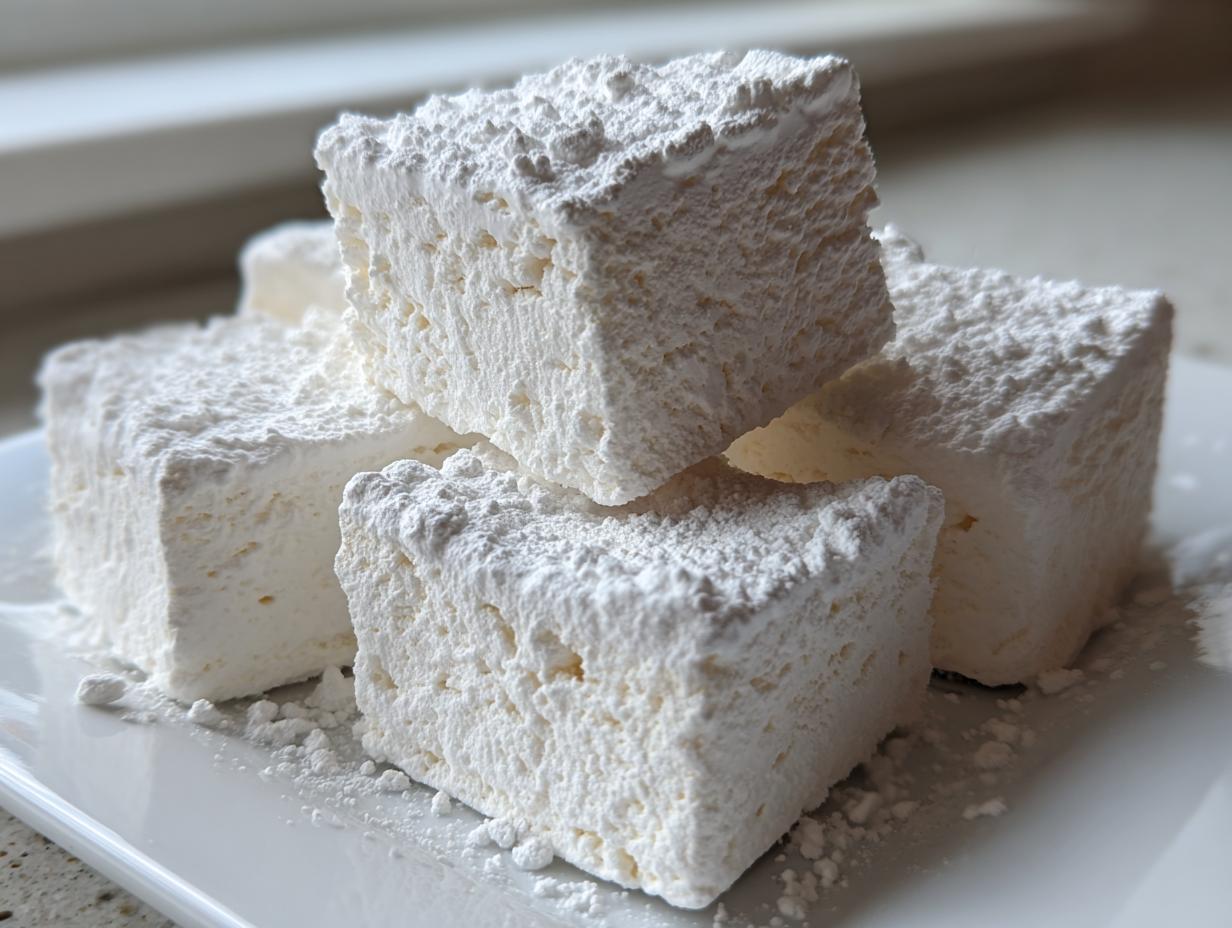
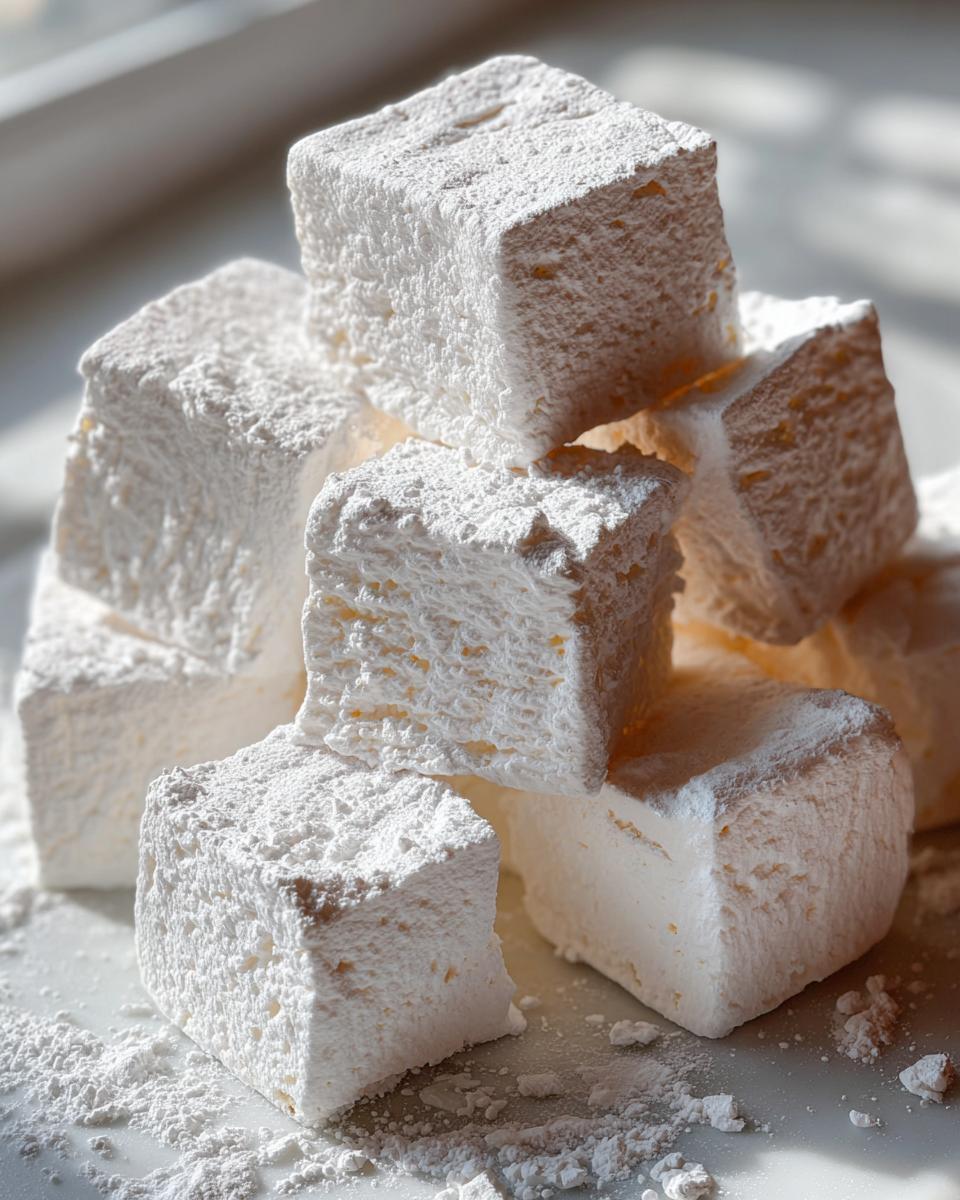
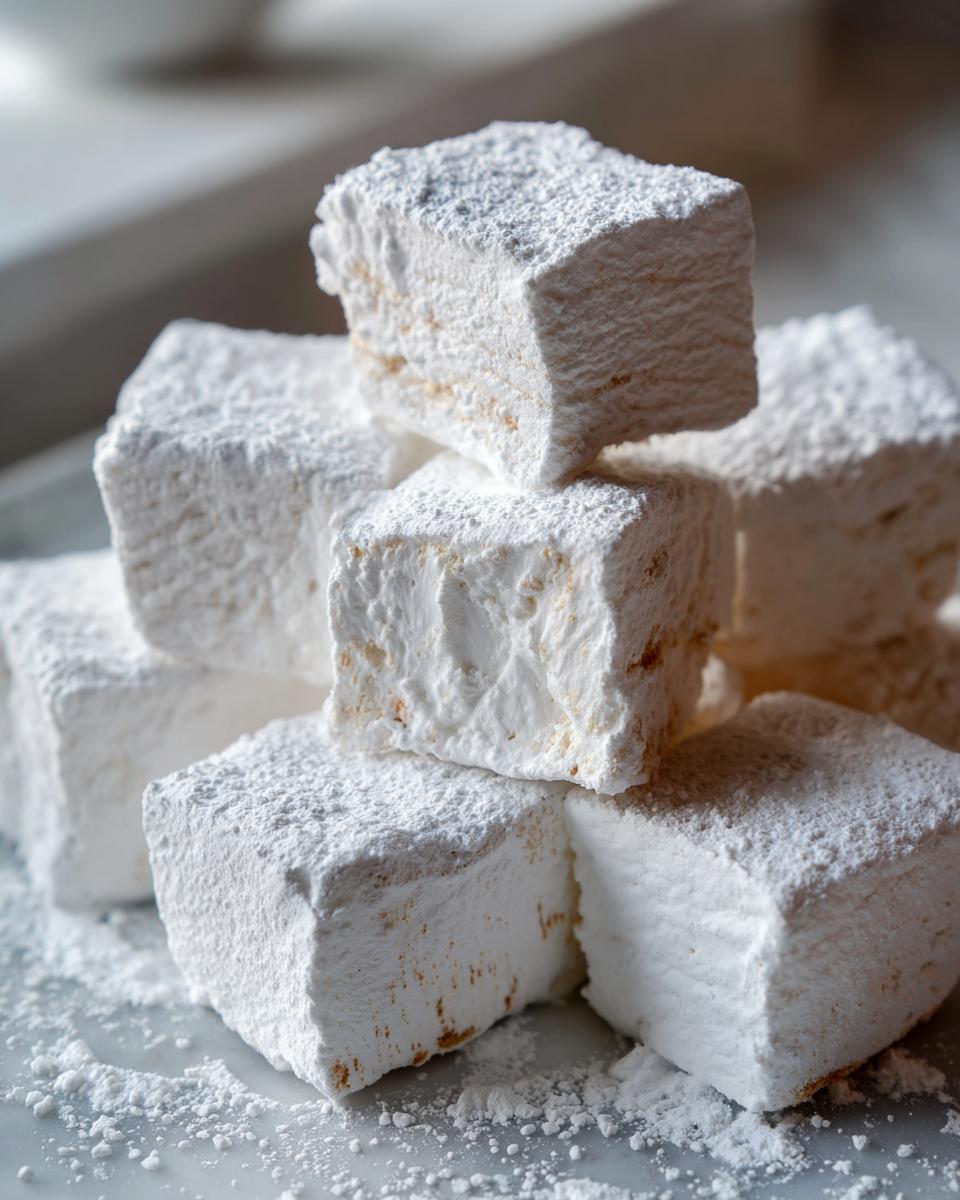
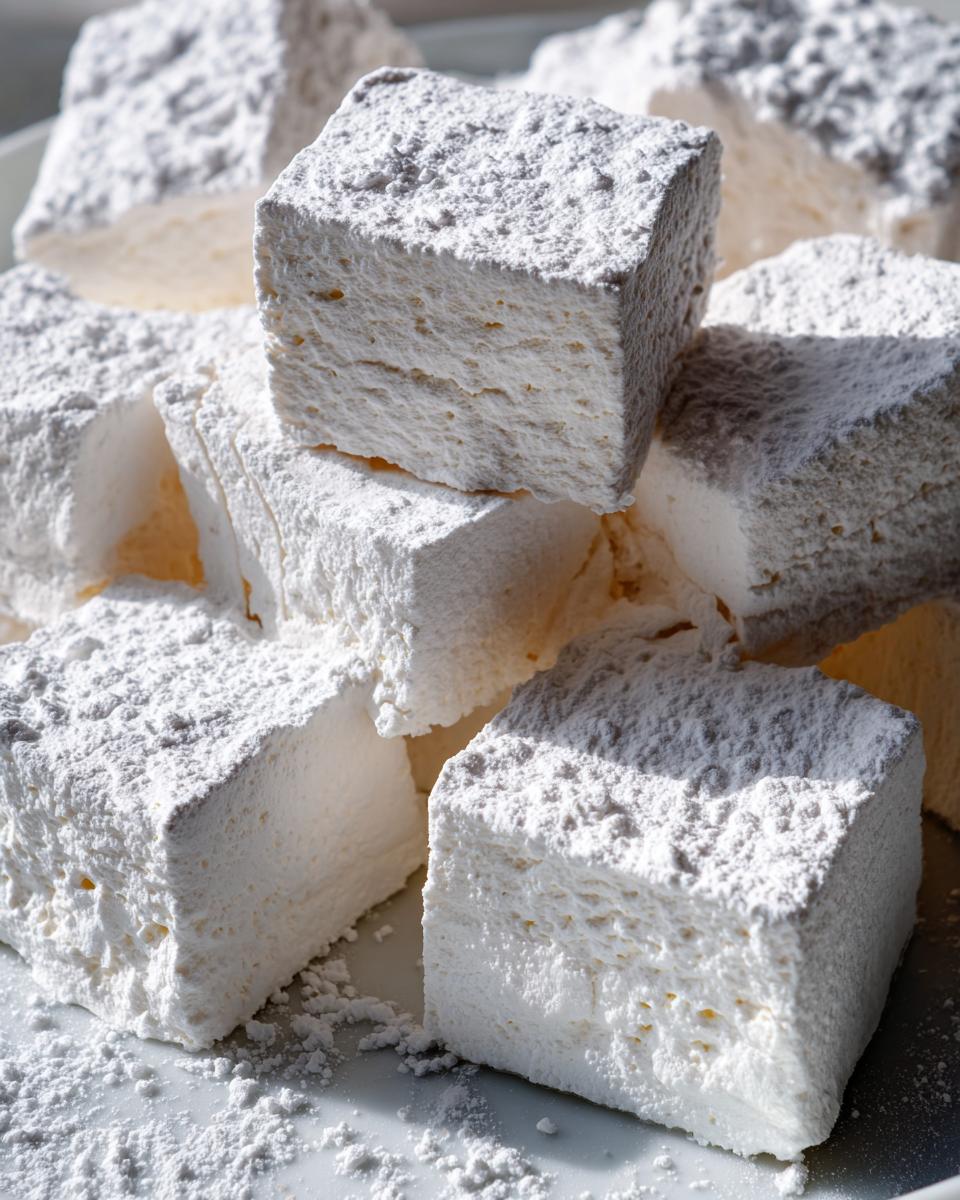
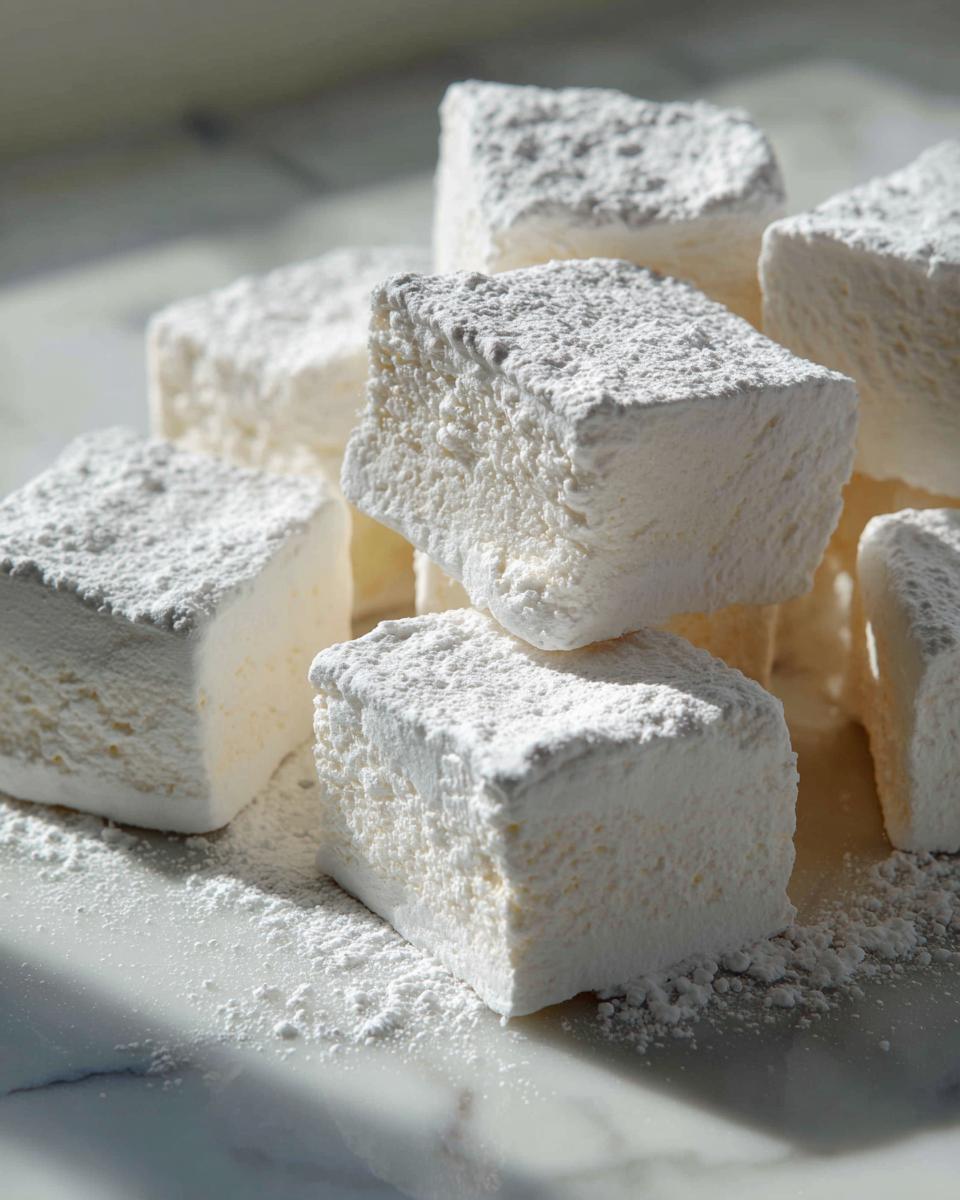
Once they are completely firm to the touch, it’s time for the big reveal! Tip the pan out onto a surface generously covered with your remaining powdered sugar and cornstarch mixture. If you prepared your pan well, this should slide out easily. If it seems reluctant, gently run a thin offset spatula around the edges first.
Now for the moment of truth: cutting! If you want those beautiful, uniform squares that look super professional, you need a clean, non-stick edge. My trick for achieving those perfect edges on your soft homemade candy is to use a large, sharp knife or, even better, a pizza cutter that has been lightly brushed with vegetable oil. This prevents the sticky fluff from dragging as you slice.
I always use a gentle sawing motion rather than pressing straight down, especially when cutting into the corners. Once you have your squares, take the remaining dusting mixture and toss each piece lightly in a bowl, making sure all the cut sides are coated. This final toss is what seals the deal and makes sure your homemade marshmallows don’t end up sticking together in the container later. If you haven’t made any chewy treats recently, these are a fantastic starting point—sort of like a fluffy version of my snickerdoodle blondies recipe!
Tips for Gourmet Marshmallow Recipes and Variations
Don’t let the simplicity of the base recipe fool you; these homemade marshmallows are begging to be jazzed up! Since we nailed the technique for that ultimate fluff, now you have the confidence to turn these into something really special. Think of this as your pathway to making spectacular gourmet marshmallow recipes that people will rave about. These are perfect for holiday exchanges or just making your everyday hot chocolate feel luxurious.
The recipe notes mentioned a couple of simple swaps, but let’s dive into those flavoring ideas. The key to success with any variation is to add the flavoring right at the very end, during that last minute of the stand mixer whip. If the extract or powder hits the hot syrup too soon, it can split or weaken the mixture.
For instance, if you want to turn these into festive peppermint treats, simply add 1/2 teaspoon of pure peppermint extract in that final 60 seconds. If you want a beautiful pink swirl, mix that extract with just a tiny bit of red food coloring before adding it in. Just remember to use pure extracts, not imitation ones, for the best flavor payoff!
What about chocolate? This is slightly trickier, but totally doable. Instead of adding cocoa powder (which can mess with the texture), try this: take about 1/4 cup of your confectioners’ sugar intended for dusting and whisk in 2 tablespoons of high-quality unsweetened cocoa powder. After you cut the set block, you can toss the squares into this chocolate dusting mix instead of the plain white powder. You get the richness without compromising the structure of the main batch. Or, if you want a swirl inside, melt about an ounce of dark chocolate, let it cool slightly until it’s thick but still pliable, and drizzle it onto the marshmallow mixture *right before* you scrape it into the pan. Swirl it once gently with a toothpick—don’t overmix! It’s like making a quick swirl topping for cake batter, similar to how I handle my chocolate chip cheesecake.
Another fantastic idea for a more complex flavor profile, especially if gifting these homemade vanilla sweets, is adding citrus zest. A teaspoon of fresh orange zest whipped in during the last minute pairs surprisingly well with the vanilla and the sweetness. It just adds that little bit of bright zing. Always have fun experimenting; the aeration step is very forgiving once you have mastered the basic steps!
Serving Suggestions for DIY Marshmallows for Hot Chocolate
The hardest part about making your own batch of homemade marshmallows is the waiting period! But once they are set, you realize you’ve created so much more than just a sweet snack—you’ve made an ingredient. I find that the applications for these fluffy squares are almost endless, but let’s focus on the absolute best ways to enjoy these DIY marshmallows for hot chocolate.
Of course, the classic use is topping a steaming mug of cocoa. You need a good, rich hot chocolate for this. When you drop one of these soft homemade candy squares into the hot liquid, watch it slowly melt and create that silky, sweet foam layer right on top. It’s pure comfort, and you’ll never want to use those dry, store-bought versions again. If you are looking for a great savory complement to balance out all this sweetness, you might want to try my creamy white chicken chili recipe later!
And let’s talk about s’mores! Forget the grocery aisle marshmallows for a second. When you use one of these homemade marshmallows over a campfire or even under the broiler, they toast up beautifully and the outside caramelizes just perfectly. Because they are less dense than the commercial kind, they seem to puff up even bigger when heated, resulting in the ultimate gooey center for your campfire sandwich. They are definitely the best choice for marshmallows for s’mores.
Beyond those two classics, don’t forget about gifting! Cut these homemade vanilla sweets into perfectly uniform sizes, line a small tin or box with parchment paper, and dust them lightly one last time before sealing. They make the most thoughtful, unexpected edible gift, especially around the holidays. People are always so amazed they were made at home! If you want to see another simple, crowd-pleasing treat that’s great for sharing, check out this recipe for easy homemade marshmallows for more inspiration.
Storing Homemade Vanilla Sweets
Your beautiful batch of homemade marshmallows is finally set, cut, and coated in that glorious, non-stick dust. Hooray! But now that you’ve put in all that hard work—the sugar cooking, the intense whipping—we need to make sure these treasures last! Storing these correctly is easy, but there are a few key things you just can’t skip if you want them to maintain that perfect, cloud-like texture down to the very last square.
The number one rule for storing any soft homemade candy you make is simple: keep them away from moisture and air! Moisture is the enemy, my friends. If your beautiful little cubes get exposed to humidity, that pretty dusting of cornstarch and sugar will start to dissolve, and bam—you’ve got sticky squares stuck together again. We worked so hard to avoid that!
Always use an airtight container. A sturdy plastic container with a tight-fitting lid works perfectly. If you’re gifting them, use cellophane bags tied with a nice ribbon, but make sure they are double-bagged or the candy is sitting on a small liner inside the bag. For the best results, I don’t recommend storing them in the refrigerator at all. Chilling them can sometimes cause condensation when they come back to room temperature, which leads right back to that sticky disaster we want to avoid!
As for shelf life, these homemade vanilla sweets keep beautifully at room temperature. Because they are essentially just sugar, water, and gelatin, they hold up well for about two to three weeks if stored correctly in an airtight spot. After that, they might start to firm up just a tiny bit, but they’re still totally edible. Honestly, though, I find that if they last two weeks in my house, it’s a miracle! They tend to disappear so fast, usually while I’m sneaking one out of the container to put on my evening tea. Enjoy the fruits of your incredibly easy labor!
Frequently Asked Questions About Making Marshmallows
I know when you try a new candy recipe, especially one involving heating sugar, a few tricky questions always pop up! I’ve tried to answer the most common things folks ask me about whipping up these perfect homemade marshmallows. Hopefully, this clears up anything holding you back from trying this easy marshmallow recipe!
Can I skip the candy thermometer when making homemade marshmallows?
Oh, I really wish I could tell you yes, but for the sake of achieving that beautiful, cloud-like texture dessert, the answer is honestly no. Candy making is all about reaching specific temperature stages where the sugar molecules behave exactly how we want them to. If your syrup is too cool, it will yield a very runny marshmallow that spreads everywhere and never sets—that’s just sticky failure waiting to happen. If you go too far past 240°F, you risk turning your beautiful fluff into something hard and brittle, like a piece of pulled taffy instead of a pillowy square. Trust me, that thermometer is your best friend here for results that rival the best homemade dessert recipes!
How do I get my homemade marshmallows to be perfectly white?
This is a great question, especially if you want your marshmallows to look picture-perfect for gifting! The key here is really making sure your ingredients are as clear as possible. If you use the light corn syrup, which is naturally clear, that certainly helps. If you use the honey or maple syrup as the no corn syrup option, know that they might give the marshmallows a very subtle ivory or tan hue, which I personally love because it shows off the natural sweetness! The second tip is when you add the vanilla. Pure vanilla extract is dark brown, so if you dump it in too early when the syrup is hot, it can slightly color the mixture. Adding it in that final minute of high-speed whipping keeps the flavor strong but minimizes the darkening effect on your otherwise brilliant white fluff.
What is the best way to use these soft homemade candy squares?
That gooey center of a perfectly toasted marshmallow is life-changing, right? So, my absolute favorite way to use these is definitely taking them outdoors for marshmallows for s’mores. Because they are so light and airy, they puff up wonderfully when heated over a campfire or grill, and they toast without burning as fast as the store-bought kind. Inside, they turn into the dreamiest melted goo! Secondly, they are just magical dropped into a mug of hot chocolate. They float for a minute, then slowly dissolve, making your cocoa way richer than any powder or syrup could. Seriously, treat yourself! But if you’re looking for more ways to serve them up, check out some other brilliant ideas in my guide to the best homemade dessert recipes.
Share Your Cloud-Like Dessert Creations
Well, that’s it! You’ve conquered the sugar syrup, you’ve whipped until your arms would have ached if the mixer wasn’t doing the work, and now you have a pan full of glorious, bouncy, perfect homemade marshmallows. I am so proud of you for taking the leap into candy making! I really hope you’re tempted to grab a piece right now, even though they aren’t fully set yet!
Now that you see how truly easy it is to make spectacular soft homemade candy with this recipe, I want to hear all about it! Did you go with the traditional vanilla? Did you get brave and try a swirl? Did you make them extra thick for towering s’mores?
Please, if you made these squares—or even if you have a quick question pop up about storage or use—drop a comment below! Sharing your results and your kitchen adventures is what makes Chefsily feel like a community, not just a recipe book. Your feedback helps others feel confident trying this recipe next time. Even if you’re working on saving leftovers from dinner—like figuring out what to do with my easy creamy dill dip—I love hearing from you all!
If you loved this recipe, don’t forget to give it a star rating right at the top! Happy whipping, and enjoy every single airy, sugary bite!
PrintEasy Homemade Marshmallows Recipe
Make soft, fluffy homemade marshmallows from scratch. This simple recipe yields cloud-like texture treats perfect for hot cocoa or s’mores.
- Prep Time: 20 min
- Cook Time: 15 min
- Total Time: 4 hr 35 min
- Yield: About 64 one-inch squares 1x
- Category: Dessert
- Method: Whipping/Candy Making
- Cuisine: American
- Diet: Vegetarian
Ingredients
- 1 cup cold water, divided
- 1 cup granulated sugar
- 1 cup light corn syrup (or substitute with 3/4 cup honey or maple syrup for no corn syrup option)
- 1 packet unflavored gelatin (about 2 1/4 teaspoons)
- 1 teaspoon pure vanilla extract
- Confectioners’ sugar and cornstarch mixture, for dusting
Instructions
- Lightly grease an 8×8 inch baking pan. Dust the bottom and sides generously with the confectioners’ sugar and cornstarch mixture. Set aside.
- In a small bowl, sprinkle the gelatin over 1/4 cup of the cold water. Let it bloom for 5 to 10 minutes.
- In a medium saucepan, combine the remaining 3/4 cup of cold water, granulated sugar, and corn syrup (or substitute). Heat over medium heat, stirring until the sugar dissolves. Stop stirring once it boils.
- Attach a candy thermometer to the pan. Cook the syrup without stirring until it reaches 240 degrees Fahrenheit (soft-ball stage). Remove from heat immediately.
- Pour the bloomed gelatin into the bowl of a stand mixer fitted with the whisk attachment. Beat on low speed until the gelatin softens slightly.
- With the mixer running on low, slowly stream the hot syrup down the side of the bowl into the gelatin mixture. Be careful not to pour it onto the whisk.
- Increase the mixer speed to high. Beat for 12 to 15 minutes until the mixture is very thick, glossy, white, and holds stiff peaks. This whipping creates the cloud-like texture.
- Beat in the vanilla extract during the last minute of mixing.
- Quickly scrape the marshmallow fluff into your prepared pan. Use a lightly oiled spatula to spread it evenly.
- Dust the top surface generously with more of the sugar/cornstarch mixture.
- Let the marshmallows set uncovered at room temperature for at least 4 hours, or preferably overnight, until firm.
- Once set, turn the pan out onto a surface dusted with the sugar mixture. Use a sharp, oiled knife or pizza cutter to cut the slab into squares. Toss the cut sides in the remaining dusting mixture to prevent sticking.
Notes
- For clean cuts, lightly oil your knife before slicing the set marshmallow slab.
- If you want gourmet marshmallow recipes, try adding 1/2 teaspoon of peppermint extract or a few drops of food coloring during the final minute of mixing.
- These homemade vanilla sweets are excellent for gifting when cut into uniform pieces and stored in an airtight container.
Nutrition
- Serving Size: 4 squares
- Calories: 140
- Sugar: 30
- Sodium: 5
- Fat: 0
- Saturated Fat: 0
- Unsaturated Fat: 0
- Trans Fat: 0
- Carbohydrates: 35
- Fiber: 0
- Protein: 2
- Cholesterol: 0